
Pallet visualiser
The Pallet visualiser works out how your cartons stack on a pallet. From a carton’s size, weight and units per carton, the units you want to send and the pallet size, it calculates how many cartons fit on each layer and each pallet, how many pallets you need, how full each pallet is and what it weighs, and draws the stack in 3D. It recalculates as soon as you change anything; there’s no calculate button.
Open the pallet visualiser
Section titled “Open the pallet visualiser”The pallet visualiser has no sidebar entry. Open it from:
- a product’s inventory detail page: select Pallet. The page opens with that product’s saved carton loaded;
- a purchase order: select Open pallet visualiser beside the order’s tabs. The page opens with no product chosen;
- the FBA shipment planner: select Open pallet visualiser. The page opens with every product in your shipment.
What’s on the pallet visualiser
Section titled “What’s on the pallet visualiser”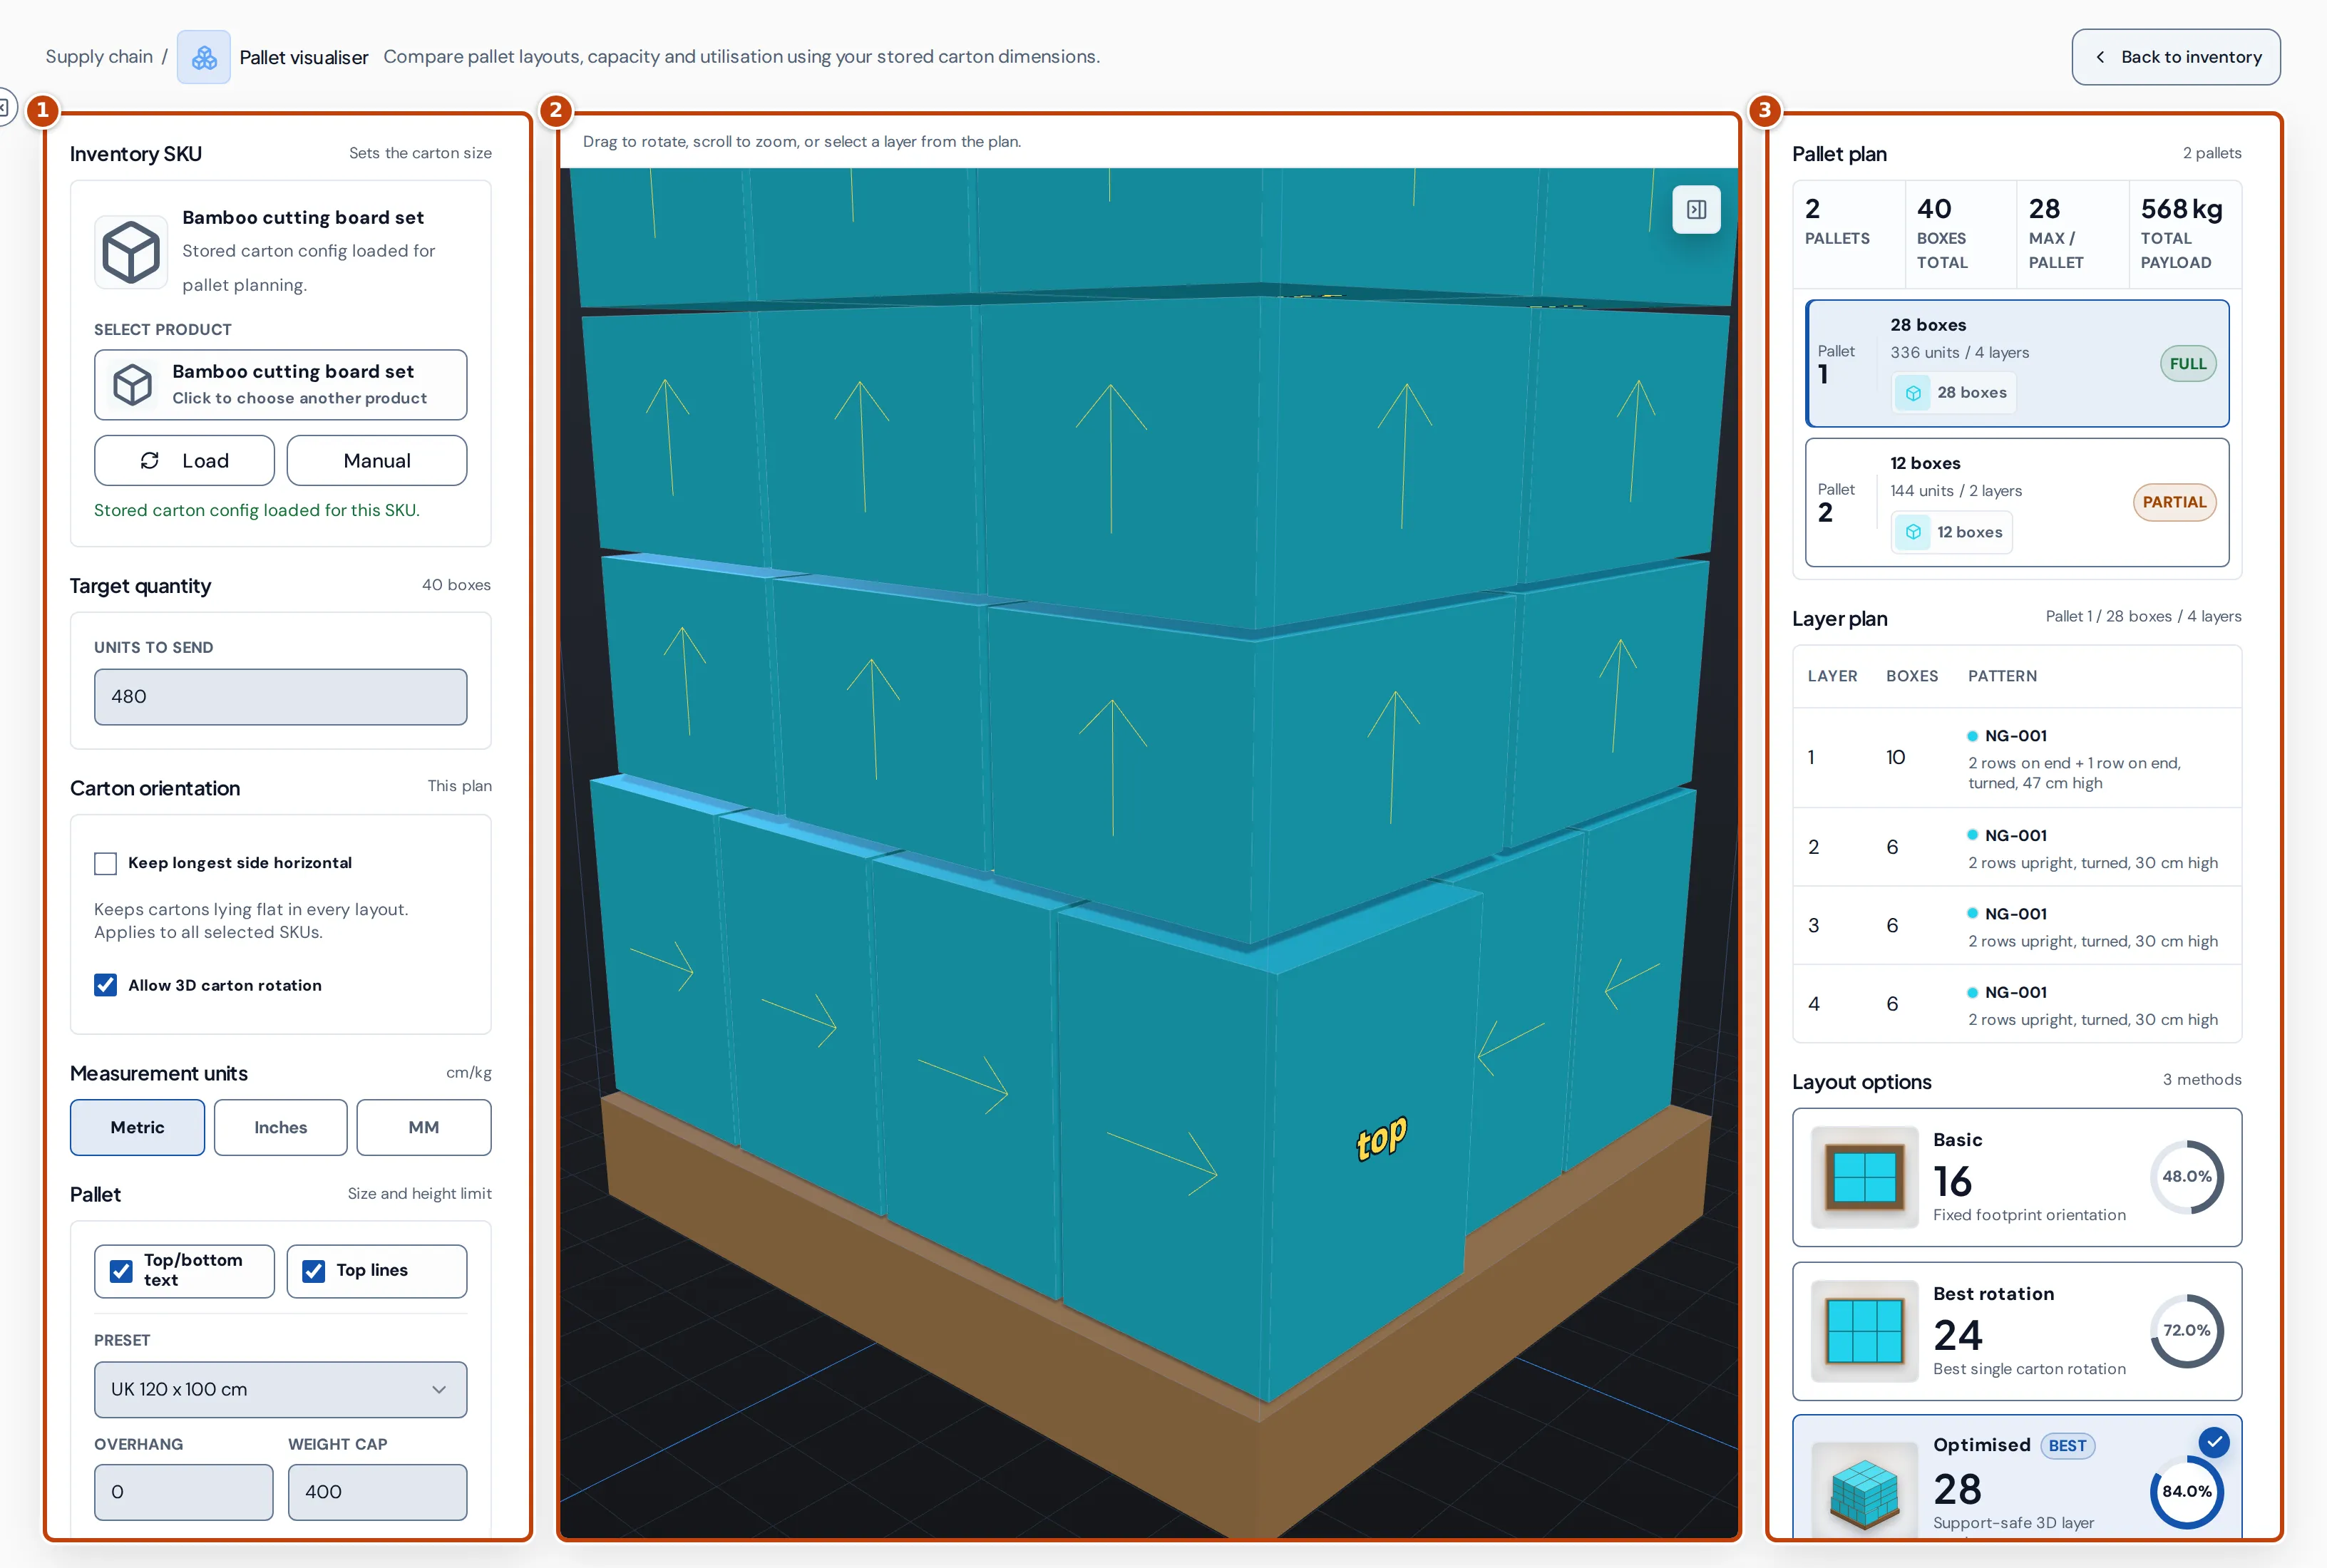
The page has three columns:
- marker 1 On the left, what you’re planning: the product and its carton, the quantity, and the pallet.
- marker 2 In the middle, the 3D view of the selected pallet. Drag to rotate it and scroll to zoom. Arrows on the cartons point the way up. Top/bottom text and Top lines, under Pallet, label the cartons’ tops and bottoms in the view.
- marker 3 On the right, the results: Pallet plan, Layer plan and Layout options. The button at the top right of the 3D view hides or shows them.
If your browser can’t draw 3D, the page says the 3D preview is unavailable. The calculations still work.
Plan pallets for one product
Section titled “Plan pallets for one product”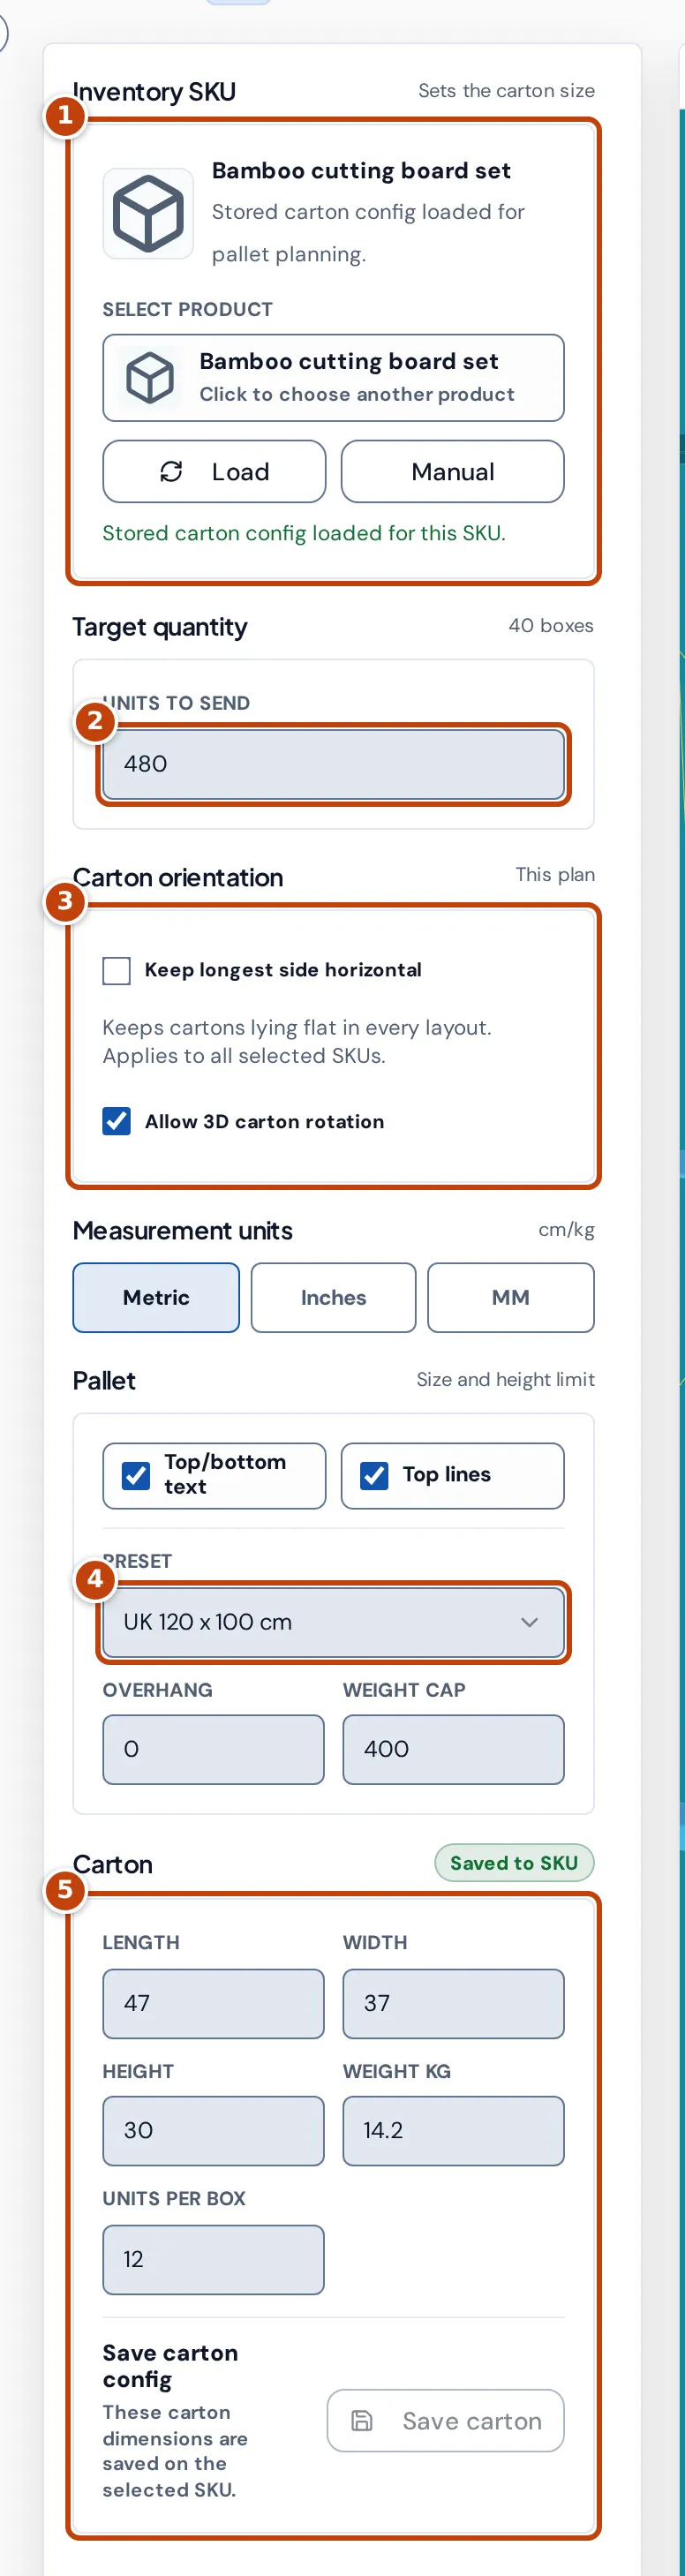
- Under Select product marker 1, search for the product and select it. Its saved carton size fills in. To type a carton in by hand instead, choose Manual input or select Manual.
- Enter the Units to send marker 2. Target quantity shows how many cartons that is, rounded up to whole cartons.
- Optional: under Carton orientation marker 3, tick Keep longest side horizontal to keep cartons lying flat, and untick Allow 3D carton rotation to stop cartons being turned on their side.
- Choose the units: Metric (cm and kg), Inches (inches and lb) or MM (mm and kg).
- Choose the pallet in Preset marker 4: UK 120 x 100 cm, EUR 120 x 80 cm, GMA 48 x 40 in or Custom. With Custom, enter the Length, Width, Pallet height and Max height.
- Optional: set the Overhang and the Weight cap.
- Check the Carton marker 5: Length, Width, Height, its weight and Units per box.
The results update as you go.
Pallet settings
Section titled “Pallet settings”- Max height is the height of the whole loaded pallet, including the pallet itself. Cartons can stack up to the max height less the pallet height. The UK and EUR presets allow 160 cm and the GMA preset 152.4 cm (60 in).
- Overhang lets cartons stick out past the pallet edge by that much on each side, so 5 cm adds 10 cm to the usable length and width.
- Weight cap limits the carton weight on each pallet, not counting the pallet itself. It starts at 400 (kg with metric units). Set it to 0 for no limit. Without a carton weight, weight isn’t checked.
These are planning settings, not Amazon’s rules. Check Amazon’s current pallet requirements for your shipment in Seller Central.
Read the results
Section titled “Read the results”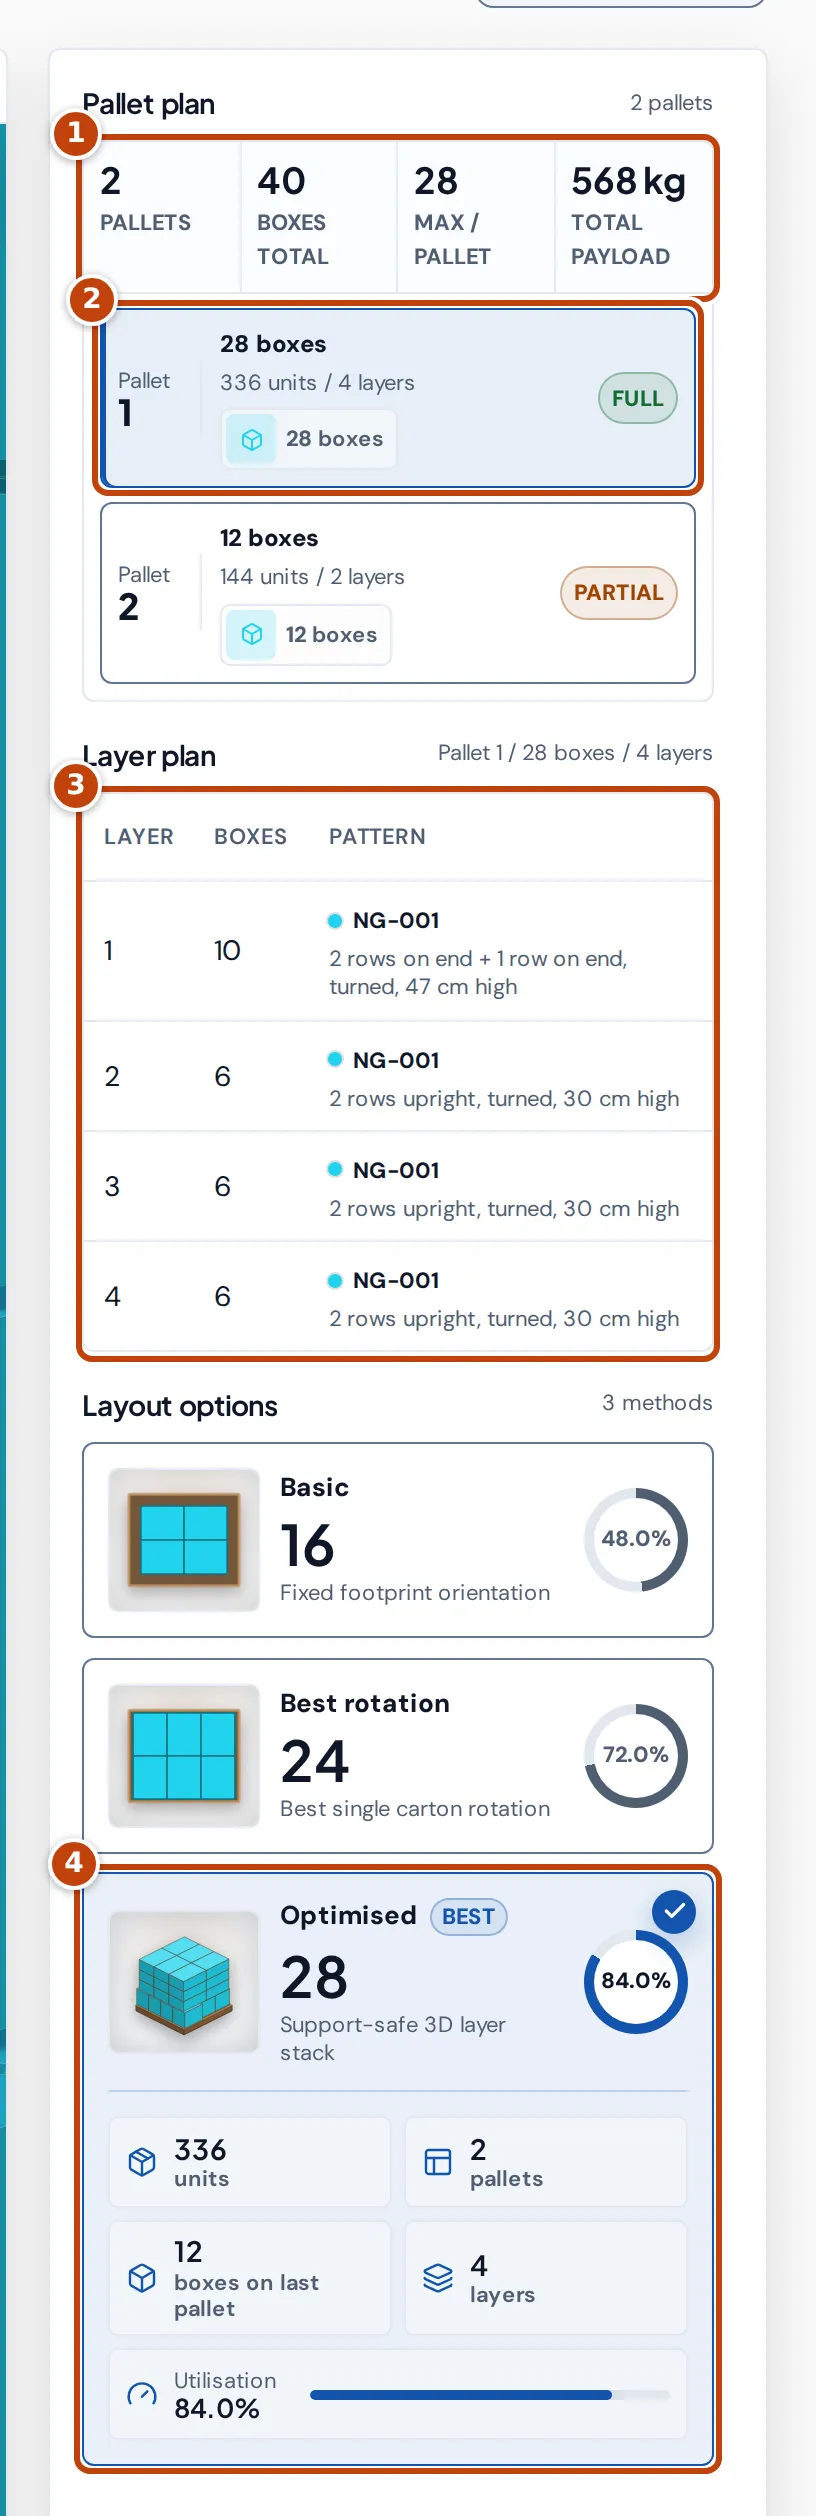
Pallet plan marker 1 totals the whole quantity: Pallets, Boxes total, Max / pallet (cartons on the fullest pallet) and Total payload (the weight of all cartons, without pallets).
Below are the pallets marker 2, each with its cartons, units and layers, and a badge: Full, Partial (fewer cartons than a full pallet of that product; with Mixed pallets, fewer than the fullest pallet) or Mixed (more than one product). The last pallet holds what’s left over. Select a pallet to show it in 3D.
Layer plan marker 3 lists the selected pallet’s layers, with the cartons in each and the pattern: the product’s SKU and how the cartons are arranged, for example “4 × 3 cartons upright”. “Upright” means a carton stands as entered, “on side” that it’s turned so its width is upright, “on end” that its length is upright, and “turned” that it’s also turned 90° on the pallet. Select a layer to show only that layer in 3D, and Show all to show the whole pallet again.
Compare layouts
Section titled “Compare layouts”Layout options marker 4 compares three ways of stacking the cartons:
- Basic: every carton the same way round, in a simple grid.
- Best rotation: the best single way round for the carton, used on every layer.
- Optimised: mixes cartons turned both ways within a layer and can stack different layers. A layer only goes on top if every carton sits fully on the cartons below. This is the default.
Each option shows the cartons per pallet and how full the fullest pallet is by volume. Best marks the option that fits the most cartons, when no other option ties. Select an option to use it; its card then shows the units on the fullest pallet, the number of pallets, the boxes on the last pallet, the layers and the Utilisation.
Plan a shipment of several products
Section titled “Plan a shipment of several products”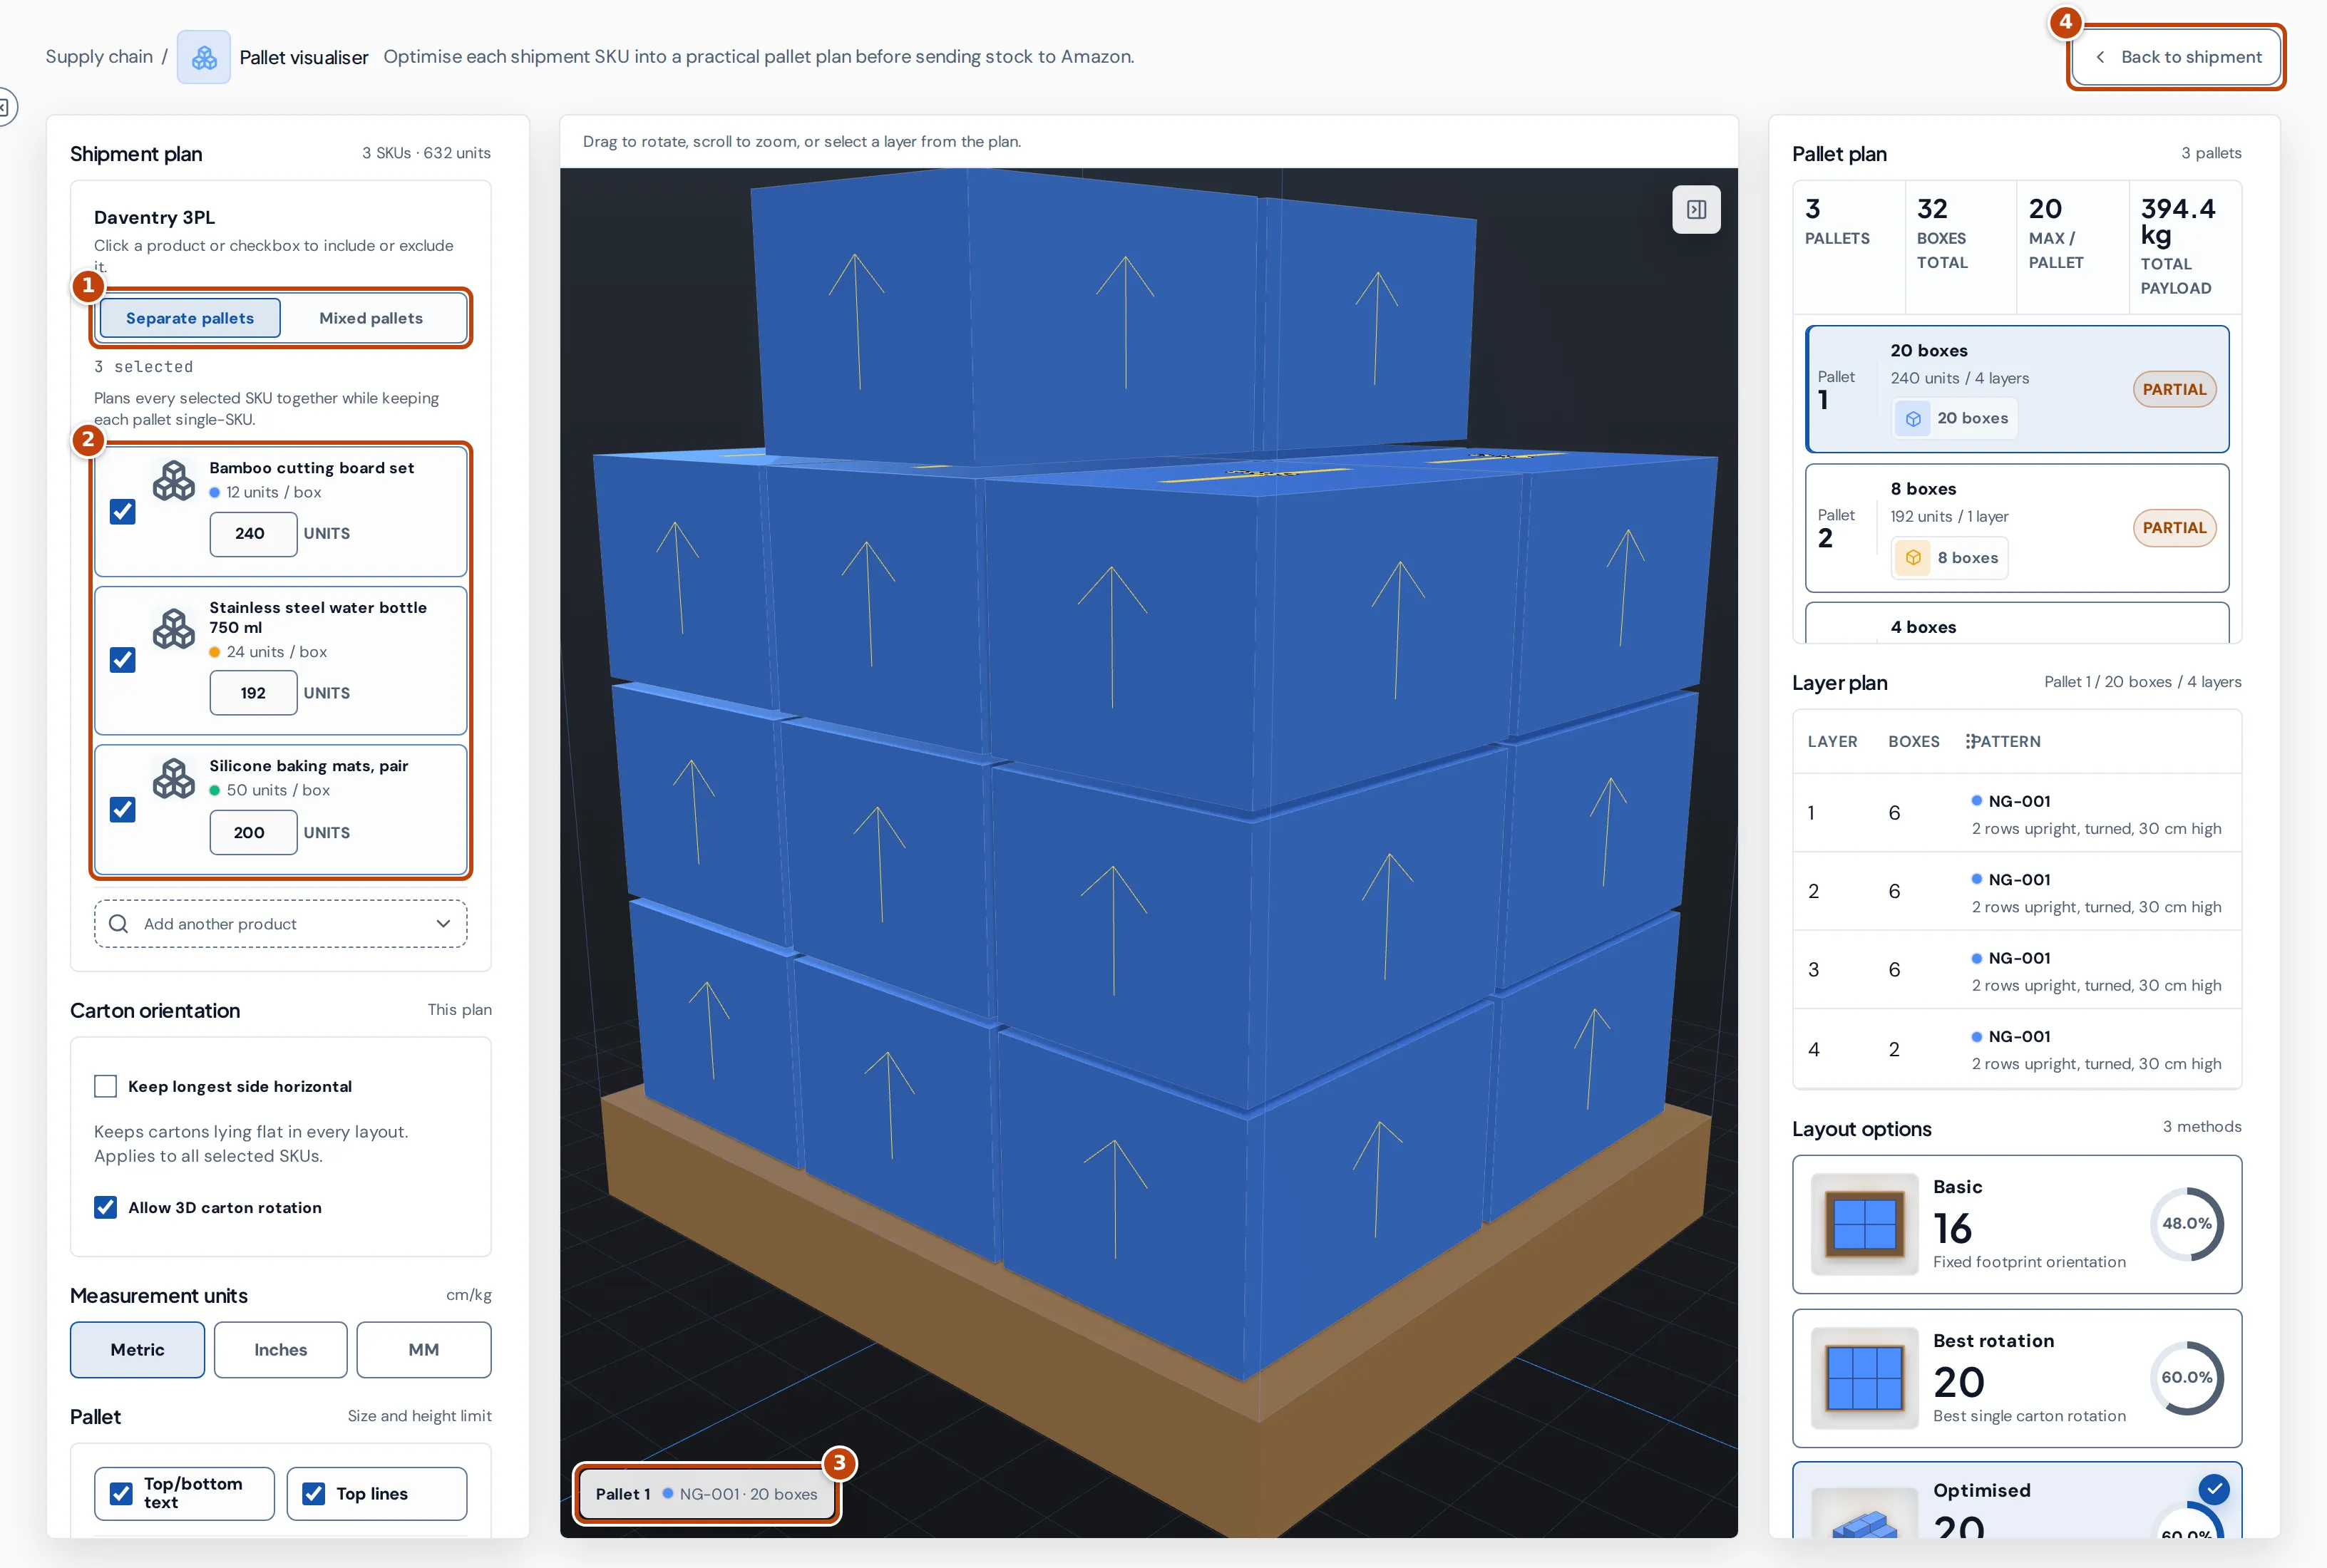
When you come from the FBA shipment planner, a Shipment plan section replaces the single product, listing each product marker 2 with its units per carton and the units to send.
- Untick a product to leave it out of the pallets. At least one product stays selected.
- Change a product’s units in its box. Selecting the box also loads that product’s carton into Carton below, so you can check or correct it.
- To add more stock from the same warehouse, open the Add another product list and choose a product.
- Choose marker 1 Separate pallets to keep each pallet to one product, or Mixed pallets to combine products on shared pallets, with one product per layer. Mixed pallets needs at least two products.
The legend on the 3D view marker 3 shows which products are on the selected pallet. marker 4 Back to shipment returns to the planner with your selection kept. Changes you make here last for this browser tab only.
Save a product’s carton size
Section titled “Save a product’s carton size”The carton size is stored on the product, so the pallet visualiser loads it next time, including for shipments from the FBA shipment planner. To save it:
- Choose the product under Select product.
- Enter the carton’s Length, Width, Height, weight and Units per box.
- Select Save carton. The label beside Carton changes to Saved to SKU.
Save carton is available when a product is selected, the size and units per box are filled in, and they differ from what’s saved. The label shows Unsaved changes when your entries differ from the saved carton, and Not saved when the product has no saved carton yet. Manual entries without a product aren’t saved.
Carton sizes can also come from your Amazon inbound shipments’ box details. A carton you save yourself takes priority.
The pallet plan itself isn’t saved or exported. Note the results before you leave the page.
Why there are no results
Section titled “Why there are no results”- Complete the carton setup: the carton has no size or no units per box. Enter the Length, Width, Height and Units per box. With a product selected, its subtitle says when no carton is saved for it.
- Complete the selected SKU setup: in a shipment, every ticked product needs a carton size and units per box. The products missing one are listed.
- No feasible carton layout.: the carton is larger than the pallet, or taller than the max height less the pallet height. Allow rotation, use a larger pallet, choose Custom and raise the Max height, or add Overhang. A Weight cap below one carton’s weight also leaves no layout.
- Some cartons are left out: with Keep longest side horizontal ticked, cartons that only fit standing on end are dropped, and the page warns you.
Choosing a product with a saved carton, or selecting Load, resets the pallet to the UK preset (or GMA for inches), switches the units to the ones its carton was saved in, ticks Allow 3D carton rotation again, and sets Units to send from the product’s stock. Set a custom pallet and your quantity again after choosing the product.