
Settings
Settings holds your own login details and the settings of the business you have open: currency and timezone, notification emails, the tax home and calculation policy behind your VAT and profit figures, and the Amazon connections that feed everything else.
Open Settings and the other account pages
Section titled “Open Settings and the other account pages”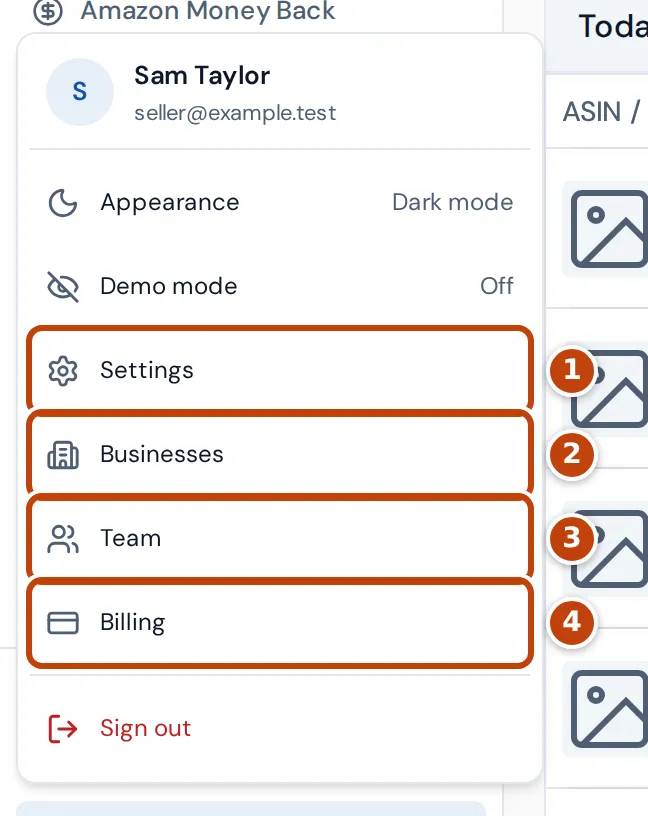
Open the account menu (your name at the bottom of the sidebar). It has four account pages:
- marker 1 Settings: this page.
- marker 2 Businesses: the businesses in your account. See Businesses.
- marker 3 Team: the people who can sign in to your account. See Team.
- marker 4 Billing: your trial, plan and usage. See Billing.
The same menu has Appearance, to switch between light and dark mode, and Demo mode, which hides product names, ASINs, SKUs and images when you share your screen. If you can open more than one business, the menu also lists them so you can switch.
What’s on the Settings page
Section titled “What’s on the Settings page”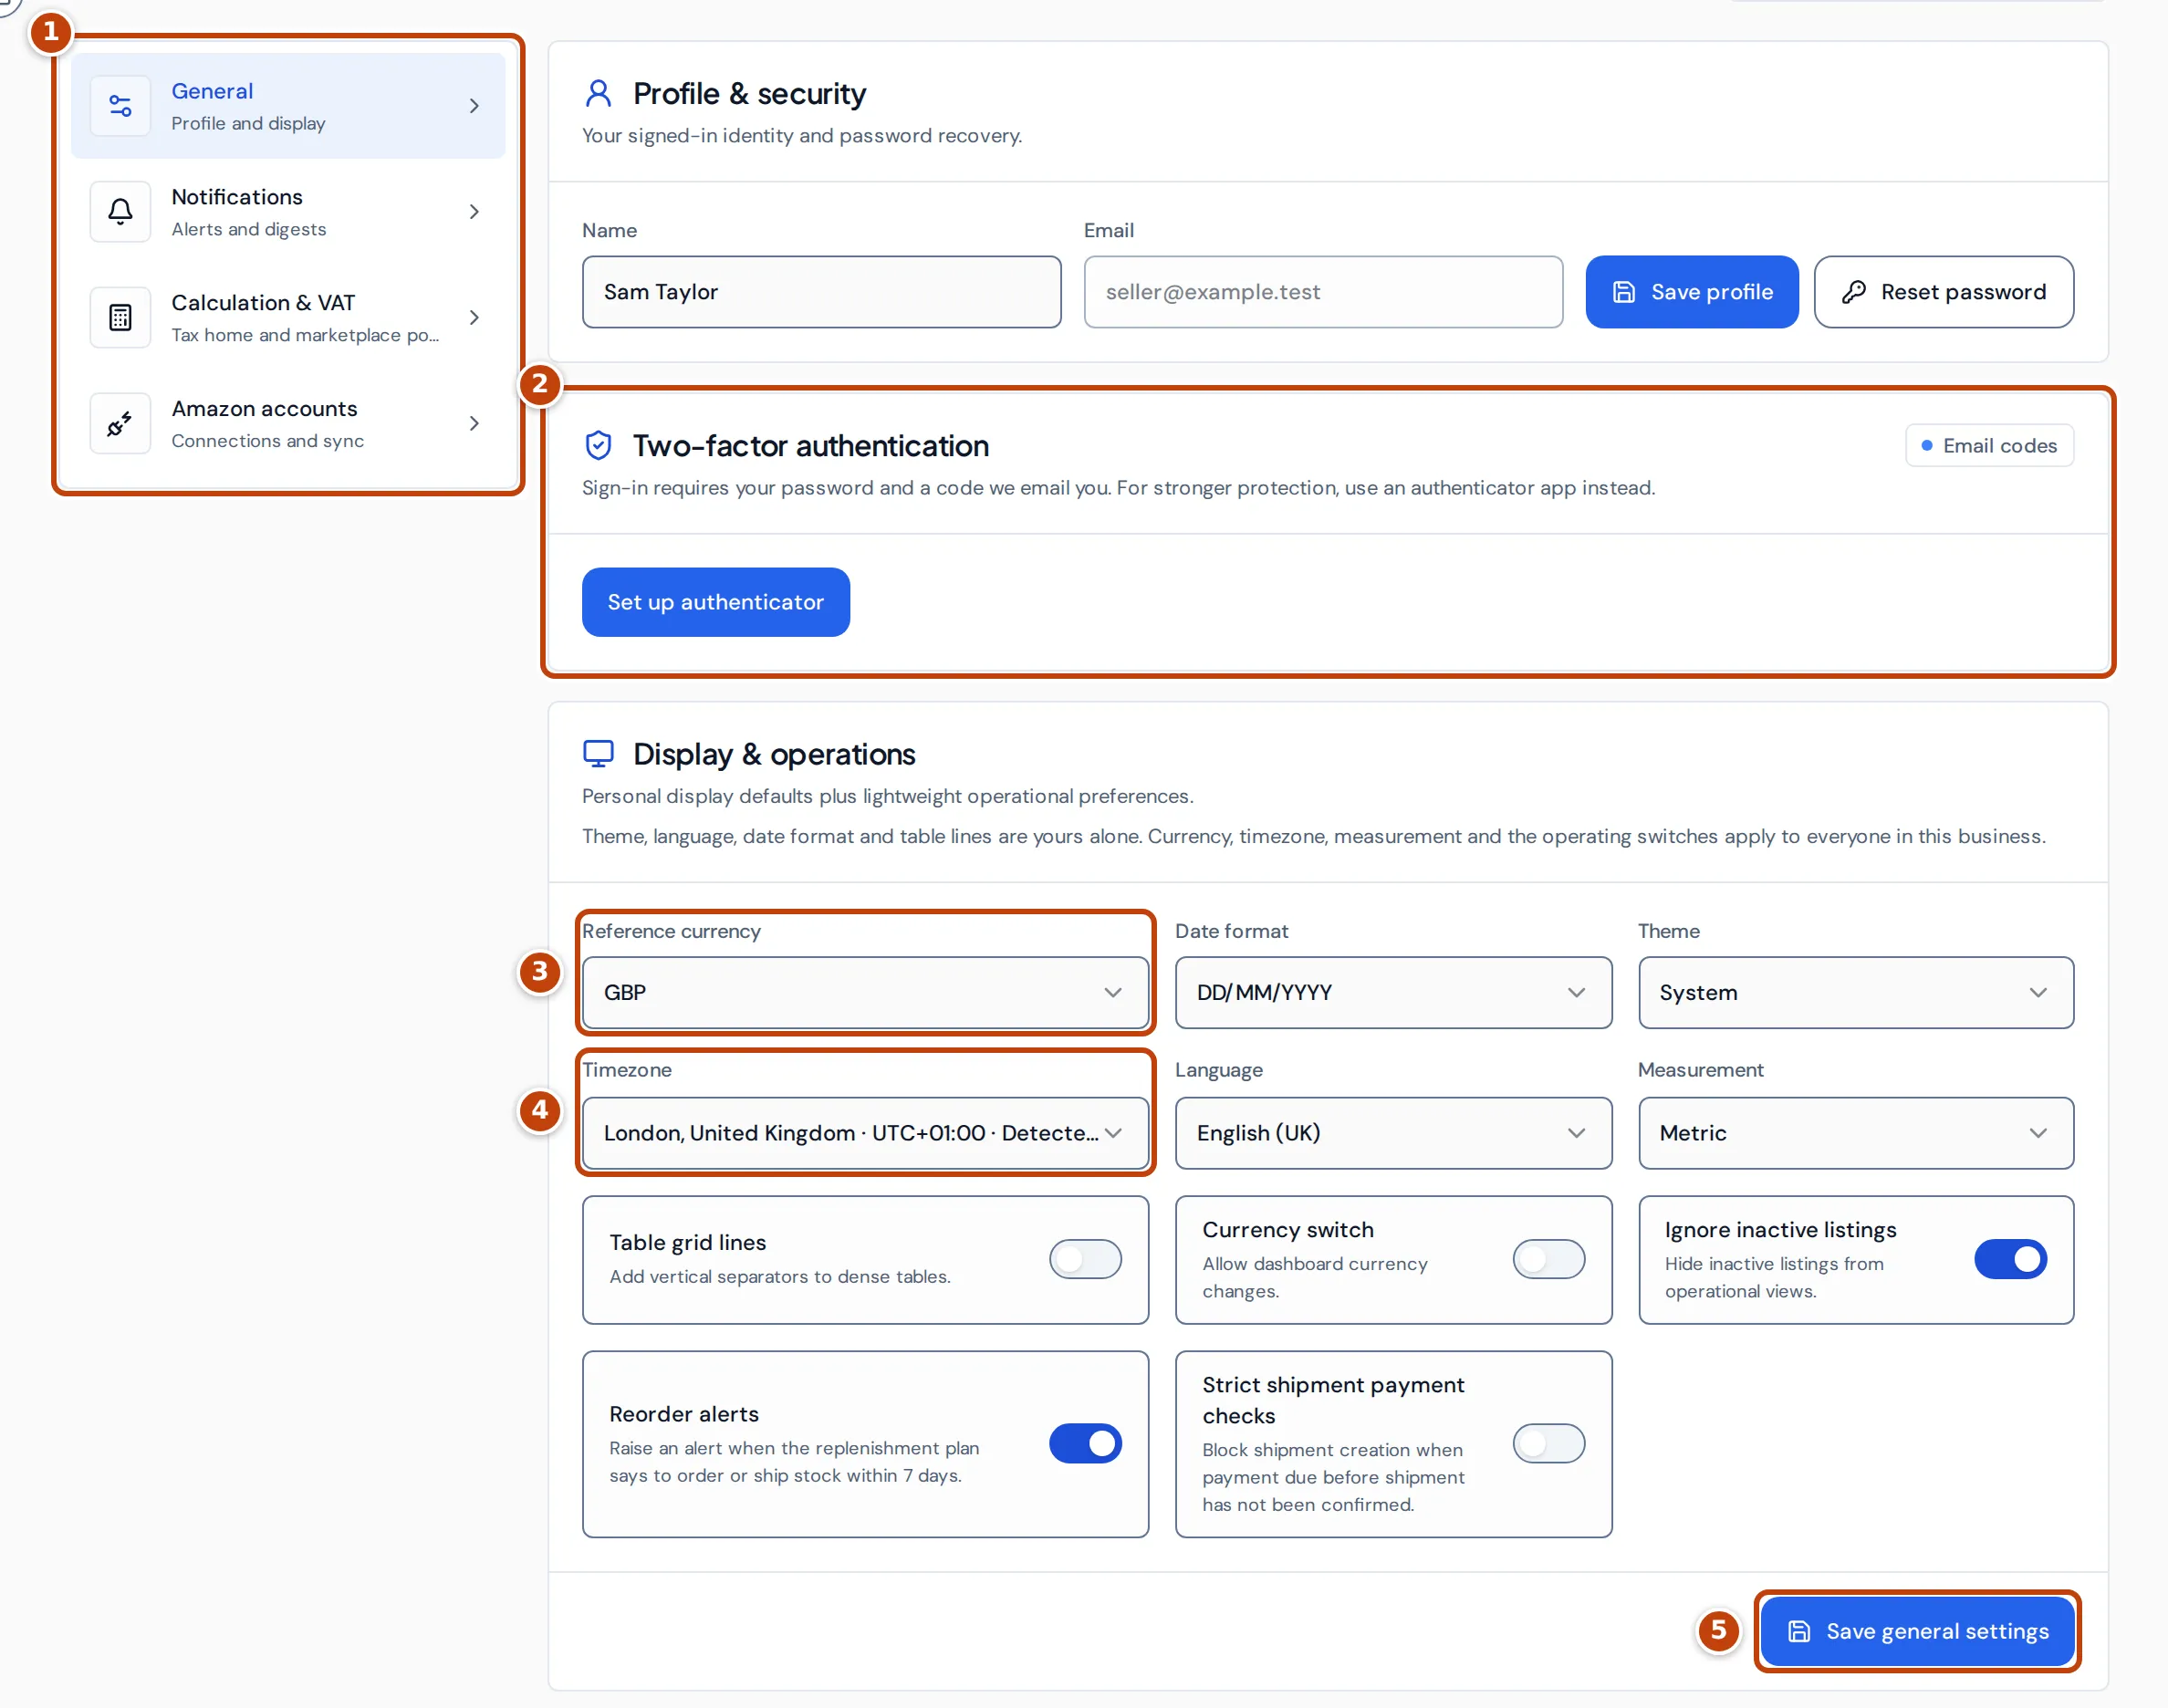
Settings has four sections, listed on the left marker 1:
- General: your profile, sign-in security, and display and business preferences.
- Notifications: which alert emails the business sends, and when.
- Calculation & VAT: your tax home and each marketplace’s calculation policy.
- Amazon accounts: Amazon connections, marketplace syncing and Amazon Ads.
The box at the top right of the page counts your connected marketplaces.
General opens first. It has your Profile & security, the Two-factor authentication panel marker 2, and Display & operations, with the business’s Reference currency marker 3 and Timezone marker 4 among your display preferences. Changes there are kept when you select Save general settings marker 5.
Change your name or password
Section titled “Change your name or password”In Settings, under General, the Profile & security panel shows your name and sign-in email. The email can’t be changed here.
- Enter your new name in Name.
- Select Save profile.
To change your password, select Reset password. Crateworth emails a password reset link to your sign-in address.
Turn on an authenticator app
Section titled “Turn on an authenticator app”Every sign-in asks for your password and a code that Crateworth emails you. The Two-factor authentication panel, under General, shows Email codes while that’s how you sign in. For stronger protection, use an authenticator app instead:
- Select Set up authenticator.
- Enter your current password in Confirm your current password and select Continue. If you sign in with Google, there’s no password to enter.
- Scan the QR code with your authenticator app, or enter the setup key shown beside it.
- Save the backup codes with Copy or Download backup codes, and keep them somewhere safe. Each backup code works once if you lose your authenticator, and they’re only shown during this setup.
- Tick I have saved my backup codes.
- Enter the code your app shows in Authenticator code and select Verify and enable.
From then on, sign-in asks for an authenticator code or a backup code, and no longer emails you codes. The same panel then has Generate new backup codes, which stops your previous codes working, and Remove authenticator, which returns you to email codes.
If your account’s owner requires an authenticator app, the panel says so, and until you set one up Crateworth only opens the account pages for you: Settings, Businesses, Team and Billing. Owners set this on the Team page.
Set your currency, timezone and display preferences
Section titled “Set your currency, timezone and display preferences”The Display & operations panel mixes two kinds of setting. Theme, Language, Date format and Table grid lines are yours alone. Reference currency, Timezone, Measurement and the switches below them apply to everyone in the business, and changing them needs edit access to settings. Members without it see those fields greyed out.
- Reference currency: the one currency Crateworth converts every marketplace’s figures into.
- Timezone: decides which dates Today, Yesterday and the other dashboard periods cover. Each order still counts on the day it was placed in its marketplace’s local time.
- Currency switch: adds Display currency to the account menu, so the reference currency can be changed from any page by people with edit access to settings.
- Ignore inactive listings: hides inactive listings from operational views.
- Reorder alerts: raises an alert when the replenishment plan says to order or ship stock within 7 days.
- Strict shipment payment checks: blocks creating a shipment when a payment due before shipment hasn’t been confirmed.
Select Save general settings to keep your changes.
Choose which emails you get
Section titled “Choose which emails you get”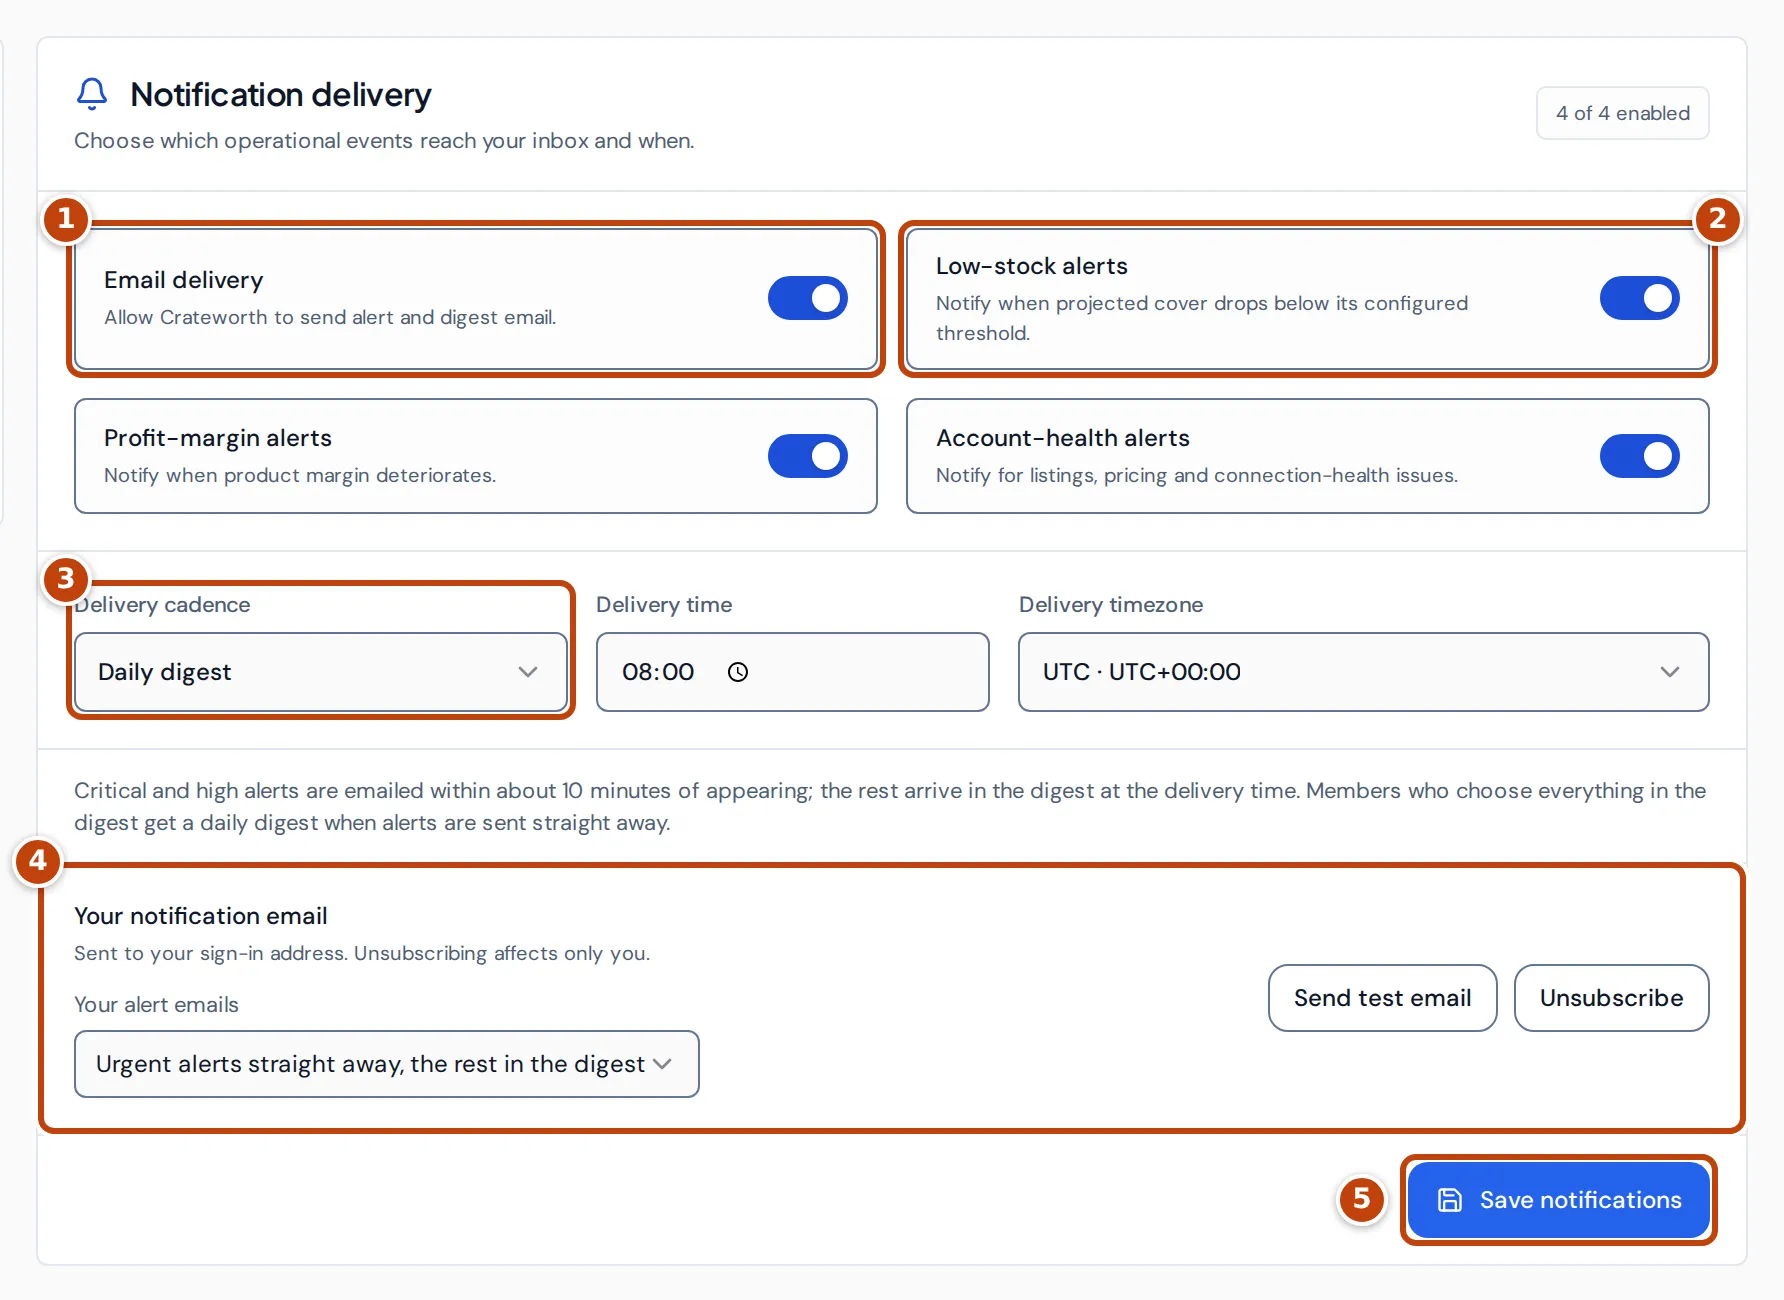
In Settings, select Notifications. The Notification delivery panel sets the business’s alert emails:
- marker 1 Email delivery turns alert and digest emails on or off.
- marker 2 Low-stock alerts, Profit-margin alerts and Account-health alerts choose which kinds of alert are emailed.
- marker 3 Delivery cadence chooses Every alert straight away, Daily digest, Weekly digest (Mondays) or Urgent alerts only. Delivery time and Delivery timezone set when the digest goes out.
Critical and high alerts are emailed within about 10 minutes of appearing. The rest arrive in the digest at the delivery time. Select Save notifications marker 5 to keep changes.
Your notification email marker 4 is just for you. Under Your alert emails, choose Urgent alerts straight away, the rest in the digest or Everything in the digest. Send test email checks that emails reach your sign-in address. Unsubscribe stops this business’s notification emails for you only, and Resubscribe brings them back.
Set or change your tax home
Section titled “Set or change your tax home”Your tax home is the country your business is based in for tax. It decides who accounts for VAT on some sales: you or Amazon. It applies to the whole business. In Settings, select Calculation & VAT. The Tax home panel shows the current country, the date it applies from and where it came from, for example Confirmed by your team.
If the tax home came from the address Amazon holds for your business and nobody has confirmed it yet, the panel offers a button to confirm that country.
To change it:
- Select Change tax home (or Set tax home if none is set).
- Choose the Country your business is based in.
- If the current tax home started before today, choose what changed under What changed? Choose one.: the old country was wrong, so correct it from the date it started, or the business moved, so use the new country from today.
- Select the save button, which names the country you chose.
Changing the tax home recalculates your VAT figures in the background. If you’re not sure which country is right, ask your accountant first. Changing the tax home needs edit access to accounting.
Why can’t I correct my tax home?
Section titled “Why can’t I correct my tax home?”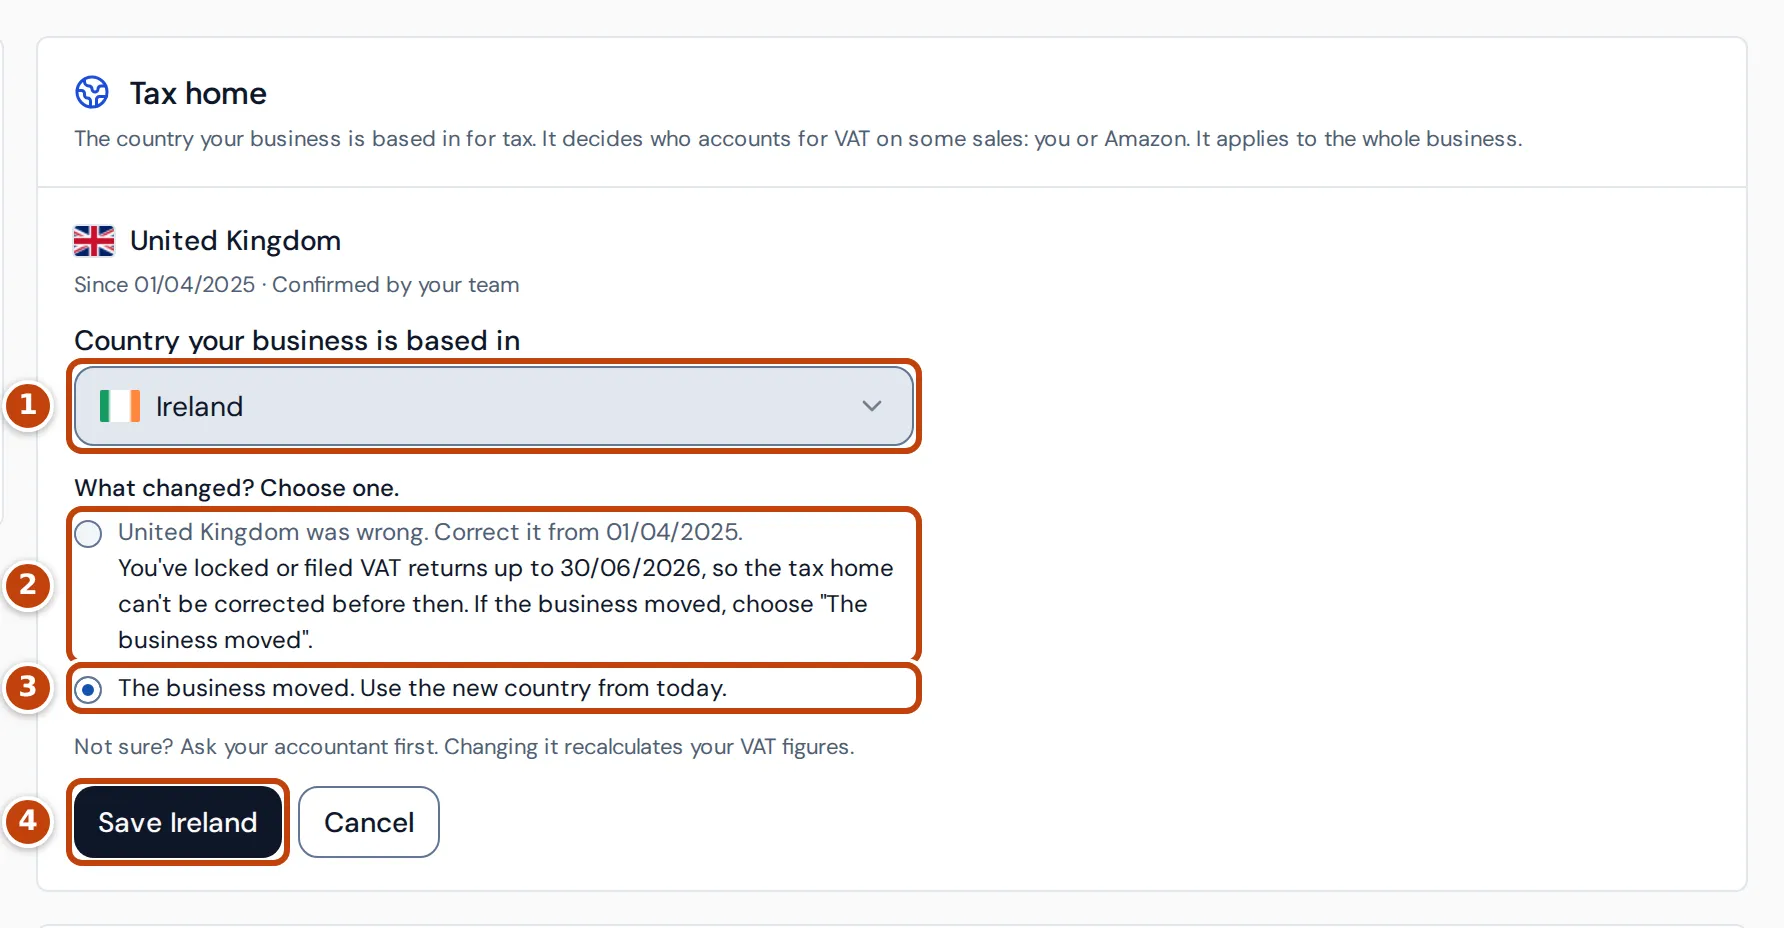
A correction rewrites the tax home from the day the current one started marker 1marker 2. Crateworth refuses it when you’ve locked or filed a VAT return that ends on or after that day, because it would change figures in a return that’s already done. The correction option is then greyed out and says up to which date your returns are locked or filed.
If the business really moved, choose The business moved. Use the new country from today. marker 3 and save marker 4. That change starts today, so it doesn’t touch your locked or filed returns, unless one of them already covers today. You lock a VAT return, or mark it as filed, on the VAT page.
Set each marketplace’s calculation policy
Section titled “Set each marketplace’s calculation policy”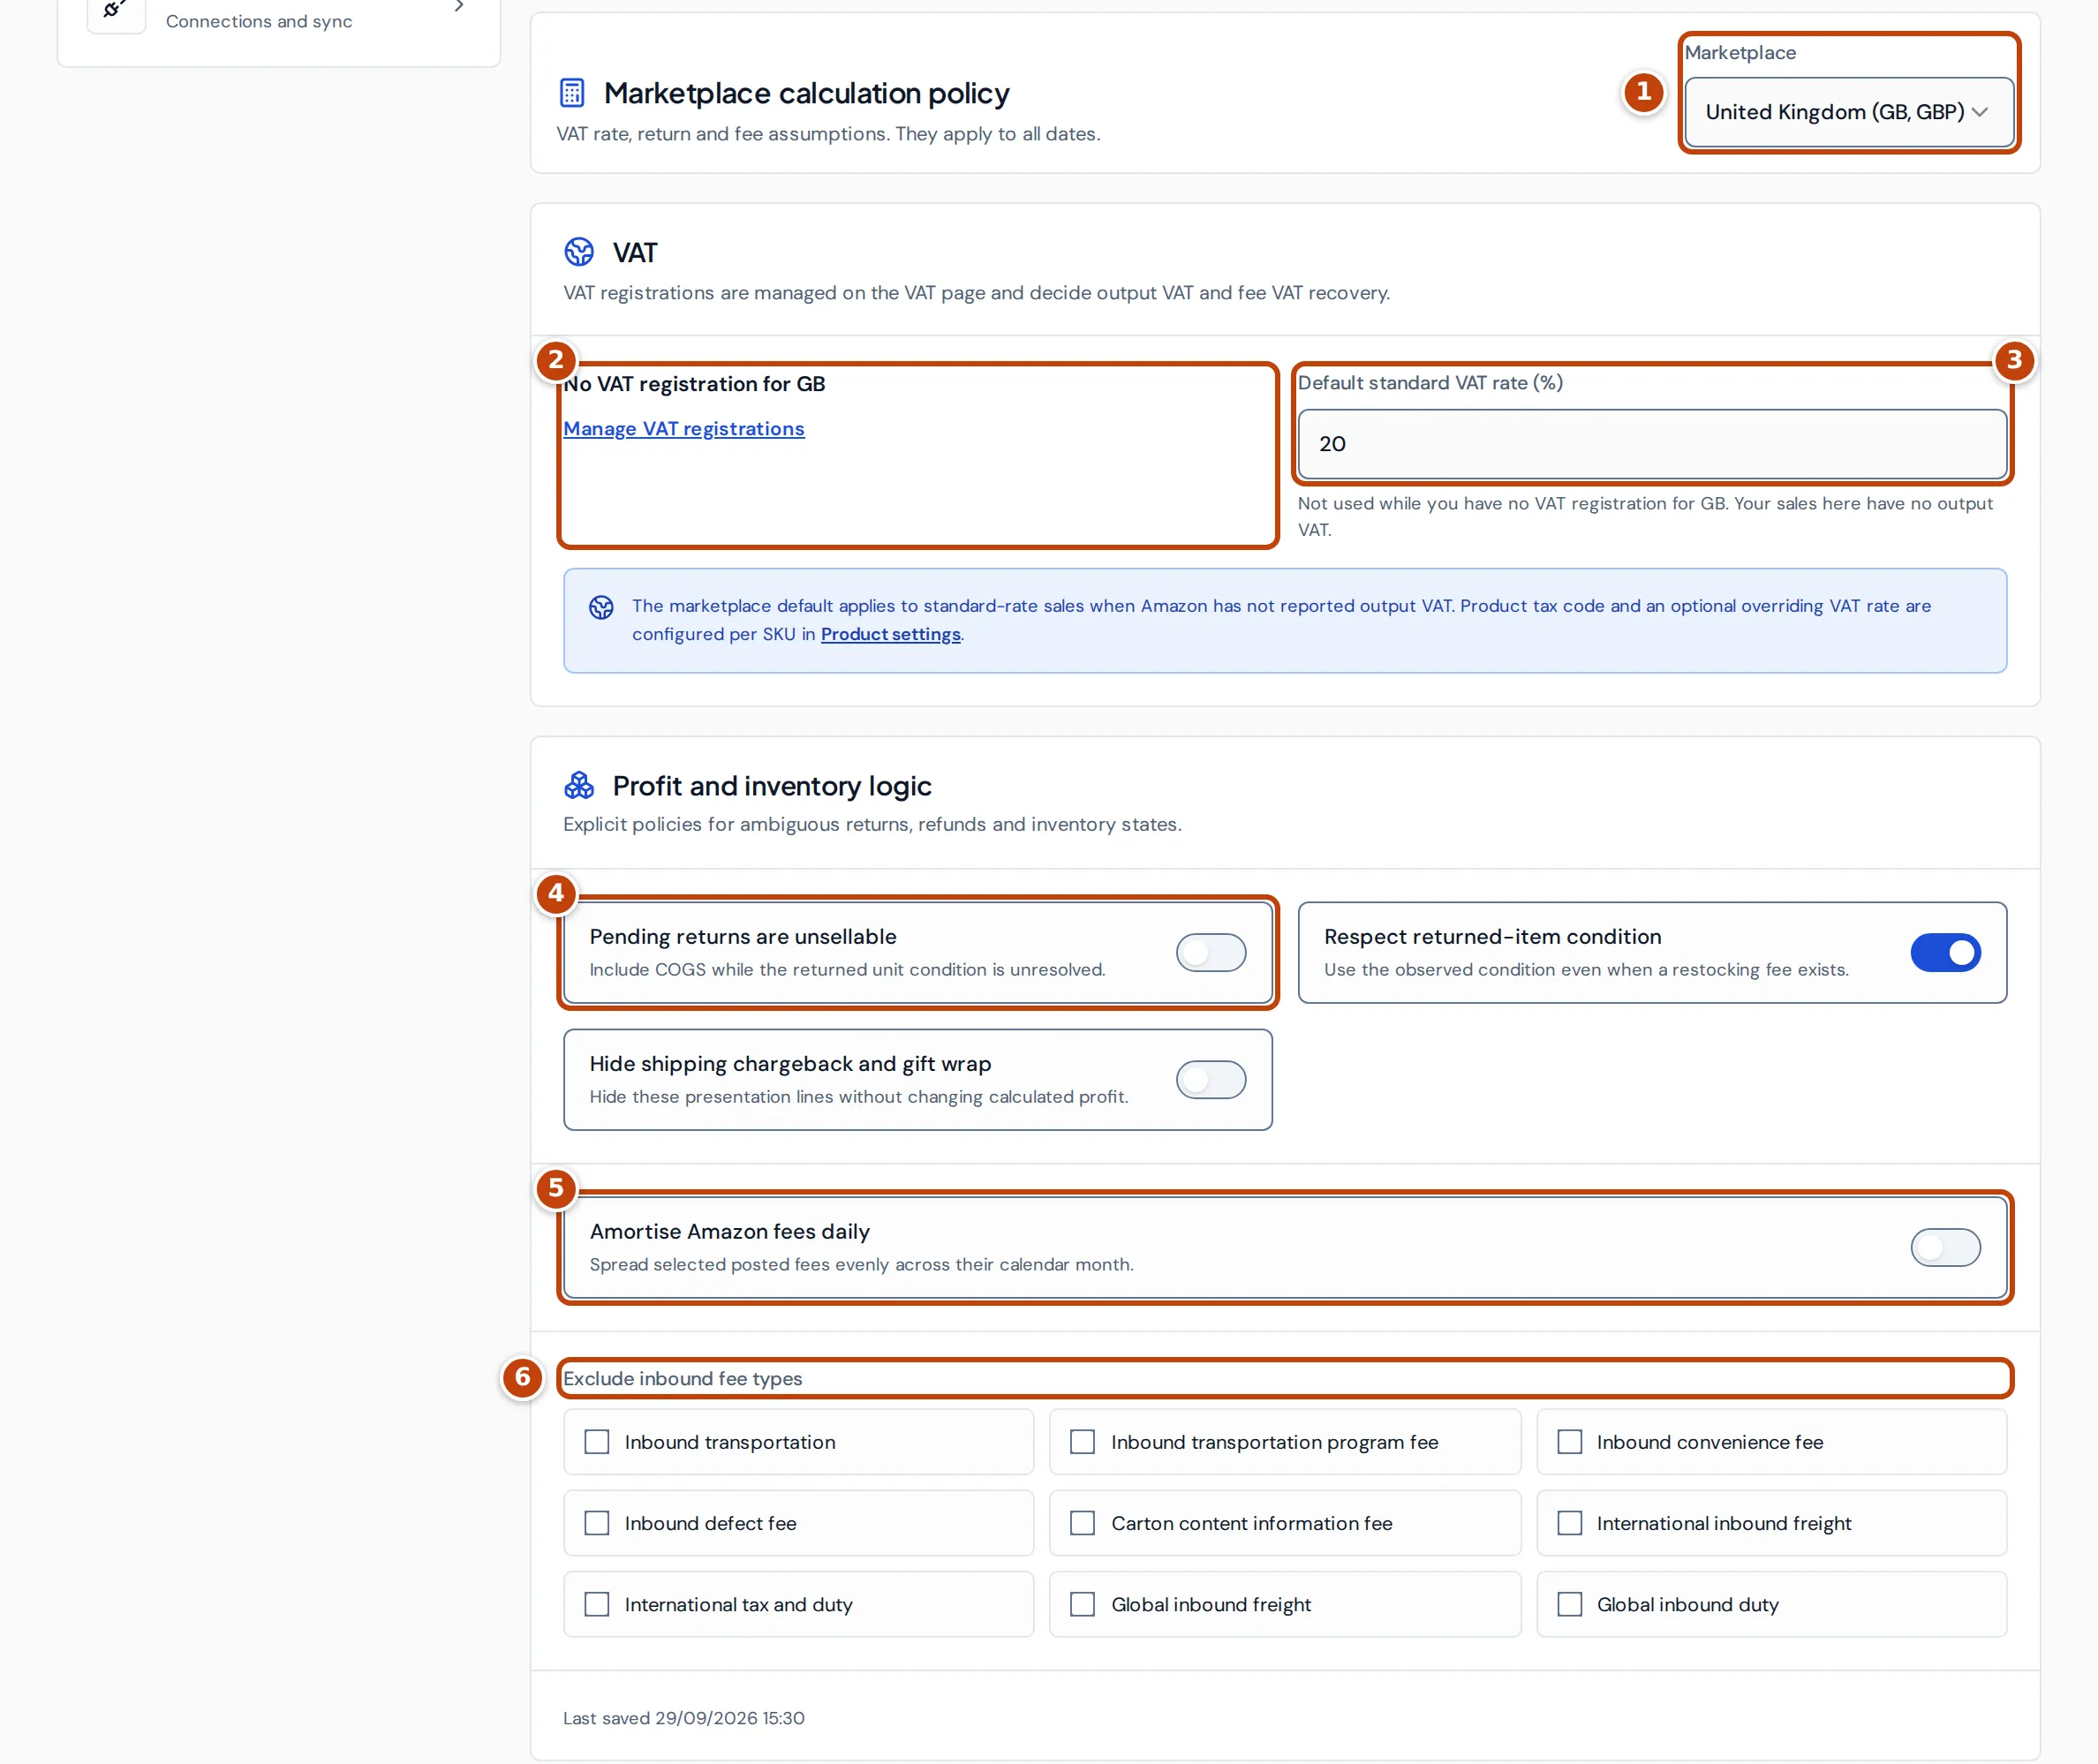
Under Calculation & VAT, the Marketplace calculation policy sets the VAT rate, return and fee assumptions for one marketplace at a time. Choose the marketplace in Marketplace marker 1. A policy applies to all dates, not just from when you change it. The one exception is fee amortisation, which has its own start date.
- marker 2 The VAT panel summarises your VAT registration for the marketplace’s country. Registrations are managed on the VAT page: select Manage VAT registrations.
- marker 3 Default standard VAT rate (%) is used for standard-rate sales when Amazon hasn’t reported the output VAT. You can set a product tax code and an overriding VAT rate per SKU in Product settings.
- marker 4 Under Profit and inventory logic: Pending returns are unsellable counts a returned unit’s cost of goods as a return cost on the Returns page while Amazon hasn’t reported its condition. Respect returned-item condition uses the condition Amazon observed even when a restocking fee exists; turned off, a return with a restocking fee is treated as sellable. Hide shipping chargeback and gift wrap hides those lines without changing calculated profit.
- marker 5 Amortise Amazon fees daily: when it’s on, tick the fees to spread and set a start date for each (today, unless you change it). Each of those fees posted on or after its start date is spread evenly across the days of the calendar month it was posted in.
- marker 6 Exclude inbound fee types: posted Amazon fees of the inbound types you tick are left out of your Amazon fees, so they don’t reduce your profit.
When you change anything, a bar appears at the bottom of the page. Select Save policy to keep the changes, or Discard to undo them. If you switch marketplace or section with unsaved changes, Crateworth asks before discarding them.
Manage your Amazon connection
Section titled “Manage your Amazon connection”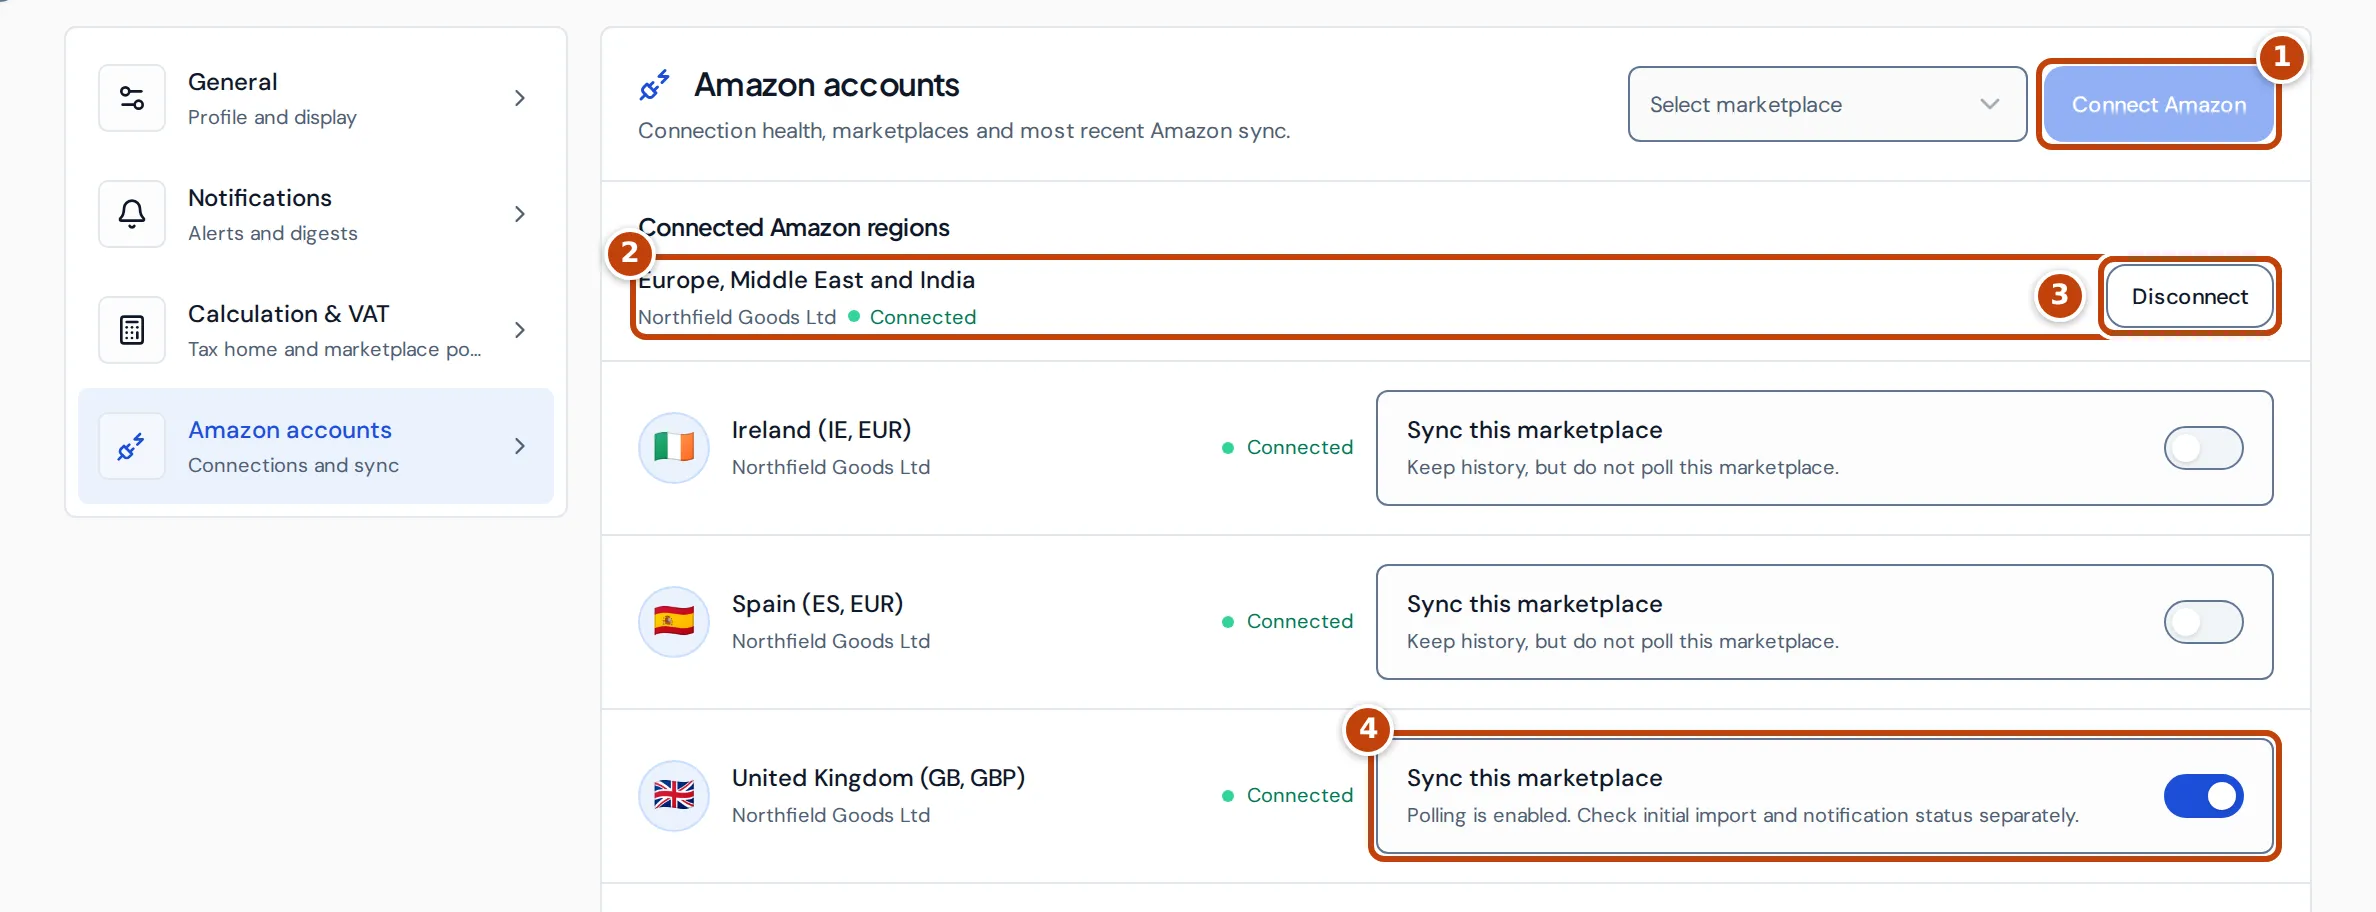
In Settings, select Amazon accounts. Under Connected Amazon regions marker 2 you see each connected Amazon region with your seller name and its state: Connected, or Reconnect needed when Amazon’s authorisation has lapsed. Connect Amazon marker 1 adds or reconnects a region, and Disconnect marker 3 removes one; both are described below.
Below the regions, each marketplace your seller account sells in has a row:
- marker 4 Sync this marketplace turns syncing on or off. Turning it off keeps the history already imported but stops fetching new data. Turning it on starts the marketplace’s first import if it hasn’t had one.
- Initial import failed appears when the marketplace’s latest import failed, with a Retry initial import button. It fetches the failed parts again, or starts the import afresh if it failed before it began. You can follow the import on Sync Health.
Further down are Subscribe & Save, Amazon Ads and Product catalogue sync. Sync products refreshes your listings, current FBA inventory and product details from Amazon.
Connect or reconnect an Amazon region
Section titled “Connect or reconnect an Amazon region”- Choose a marketplace in the region from Select marketplace.
- Select Connect Amazon. Seller Central opens and asks you to approve Crateworth.
- Approve the request. You come back to Amazon accounts.
- Turn on Sync this marketplace for each marketplace you want imported.
Reconnect a region the same way when it shows Reconnect needed. Only owners and admins can connect or disconnect Amazon.
Disconnect an Amazon region
Section titled “Disconnect an Amazon region”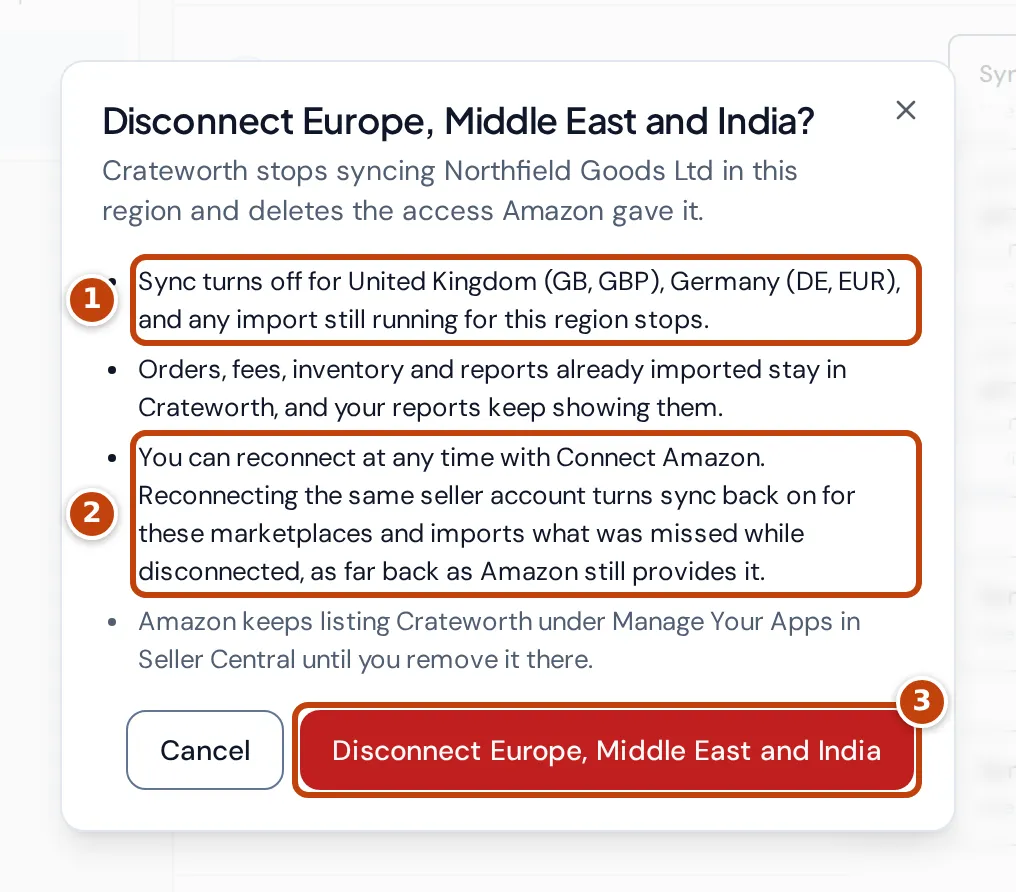
- In Settings, under Amazon accounts, select Disconnect on the region’s row under Connected Amazon regions.
- Read what happens, then confirm with the red button marker 3 in the dialog.
When you disconnect a region:
- marker 1 Sync turns off for its marketplaces, and any import still running for the region stops.
- Orders, fees, inventory and reports already imported stay in Crateworth, and your reports keep showing them.
- marker 2 You can reconnect at any time with Connect Amazon. Reconnecting the same seller account turns sync back on for those marketplaces and imports what was missed while disconnected, as far back as Amazon still provides it.
- Amazon keeps listing Crateworth under Manage Your Apps in Seller Central until you remove it there.
Connect Amazon Ads
Section titled “Connect Amazon Ads”Ad spend comes from a separate Amazon Ads connection. In the Amazon Ads panel, choose the Amazon region you sign in to for Amazon Ads and select Connect Amazon Ads. Once connected, the last 90 days are imported in the background and your advertising profiles appear after the next sync. Amazon asks for the authorisation to be renewed every year; the panel warns you when it’s due and Reconnect Amazon Ads renews it.
Delete your login
Section titled “Delete your login”The Delete my login panel, at the bottom of General, removes your own login. You can no longer sign in, and you leave every account you belong to. Accounts only you use are closed. What you did in shared accounts stays on record as “Deleted user”.
- Select Delete my login. Crateworth checks your accounts and lists what happens to each one.
- Type DELETE in Type DELETE to confirm.
- Select Delete my login in the dialog.
Deleting can’t be undone, and needs a sign-in within the last 15 minutes. It’s blocked while you own an account that other people use (transfer ownership on the Team page first) or one with a paid subscription (cancel it in Billing first).
Why can’t I change a setting?
Section titled “Why can’t I change a setting?”- Fields greyed out under Display & operations: changing the currency, timezone, measurement and operating switches needs edit access to settings. Your theme, language, date format and table lines still save.
- No Disconnect button: only owners and admins can disconnect Amazon.
- No Change tax home button: changing the tax home needs edit access to accounting.
An owner or admin can change your access on the Team page.