
Expenses
The Expenses page holds the costs of running your business that Amazon doesn’t charge you: software, a prep centre, photography, packaging, bookkeeping and so on. Crateworth takes them off your profit as indirect expenses. You can add an expense by hand, read one from an invoice, import a month of payments from your bank statement, or set up a rule that books a cost for you. To open the page, in the sidebar, under Finance, select Expenses.
The page has two tabs: Indirect expenses, the list of expenses you’ve recorded, and Expense rules, the costs Crateworth books for you automatically.
What’s on the Expenses page
Section titled “What’s on the Expenses page”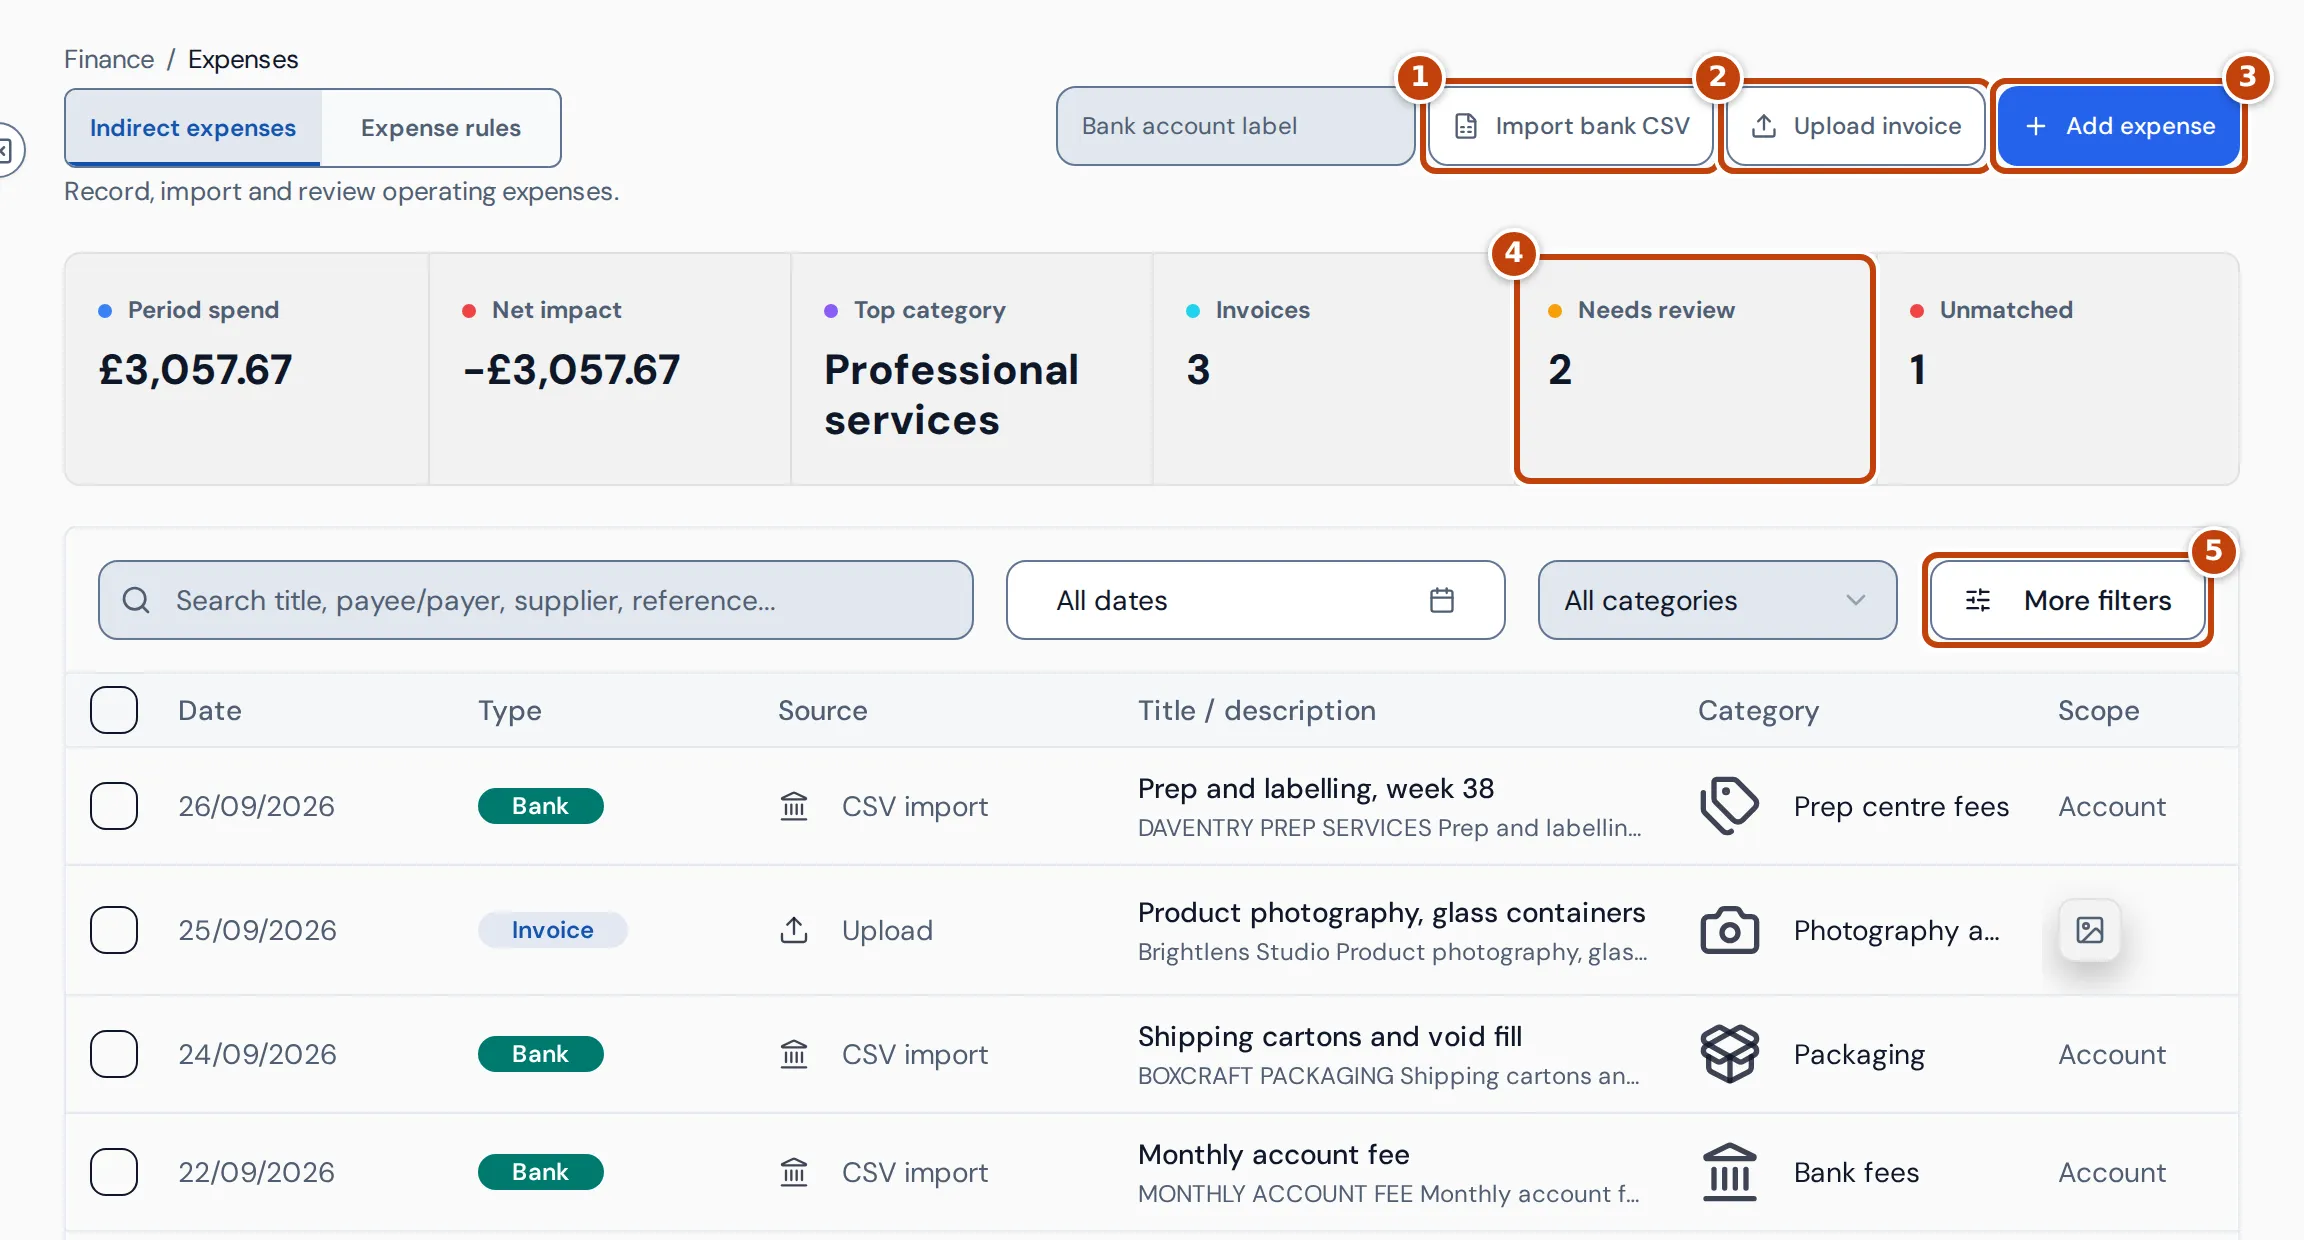
The buttons at the top add expenses:
- marker 1 Import bank CSV imports the payments from a bank statement. See Import expenses from a bank statement.
- marker 2 Upload invoice reads the lines of a PDF, PNG or JPEG invoice. See Add expenses from an invoice.
- marker 3 Add expense adds one expense by hand. See Add an expense.
The summary cards cover the expenses that match your filters:
- Period spend: the total paid, including any VAT, in your reference currency.
- Net impact: the effect on profit. Expenses count as negative and any income you’ve recorded as positive, and an expense you recover VAT on counts at its net cost.
- Top category: the category you spent most on.
- Invoices: how many expenses came from uploaded invoices.
- marker 4 Needs review: expenses with a category that nobody has approved yet.
- Unmatched: expenses with no category.
To narrow the list, search by title, payee, supplier or reference, choose dates (the list shows All dates until you do) or a category. marker 5 More filters adds the scope, products, marketplace and source (Invoice uploads, Bank CSV or Manual), a switch between amounts in your reference currency (Base GBP) and the Original currency, and four quick views: All expenses, Needs review, Unmatched and Capitalised.
What each expense shows
Section titled “What each expense shows”Each row shows the expense’s date, type, source, title, category, scope (the whole account, products or a production batch), payee, supplier, VAT and amount. Type is Manual, Invoice or Bank, or Amortised for a cost spread over a period.
Status tells you whether the expense is finished:
| Status | Meaning |
|---|---|
| Reviewed | The expense has a category and has been approved. |
| Needs review | The expense has a category, but nobody has approved it yet. |
| Unmatched | The expense has no category yet. |
| Capitalised | A bank payment you linked to a purchase order. It’s counted through the order, as a payment for its stock or as landed cost, not as an operating expense. It’s left out of the summary cards and the main list: select the Capitalised quick view to see it. |
Select a row to open it in a panel on the right, with Details and Activity tabs. On a wide screen the panel sits beside the list; on a smaller one it opens over the list. To close it, select the close button at its top right, or press Esc. While you’re reviewing an invoice, Esc asks before it discards the lines read from it.
Add an expense
Section titled “Add an expense”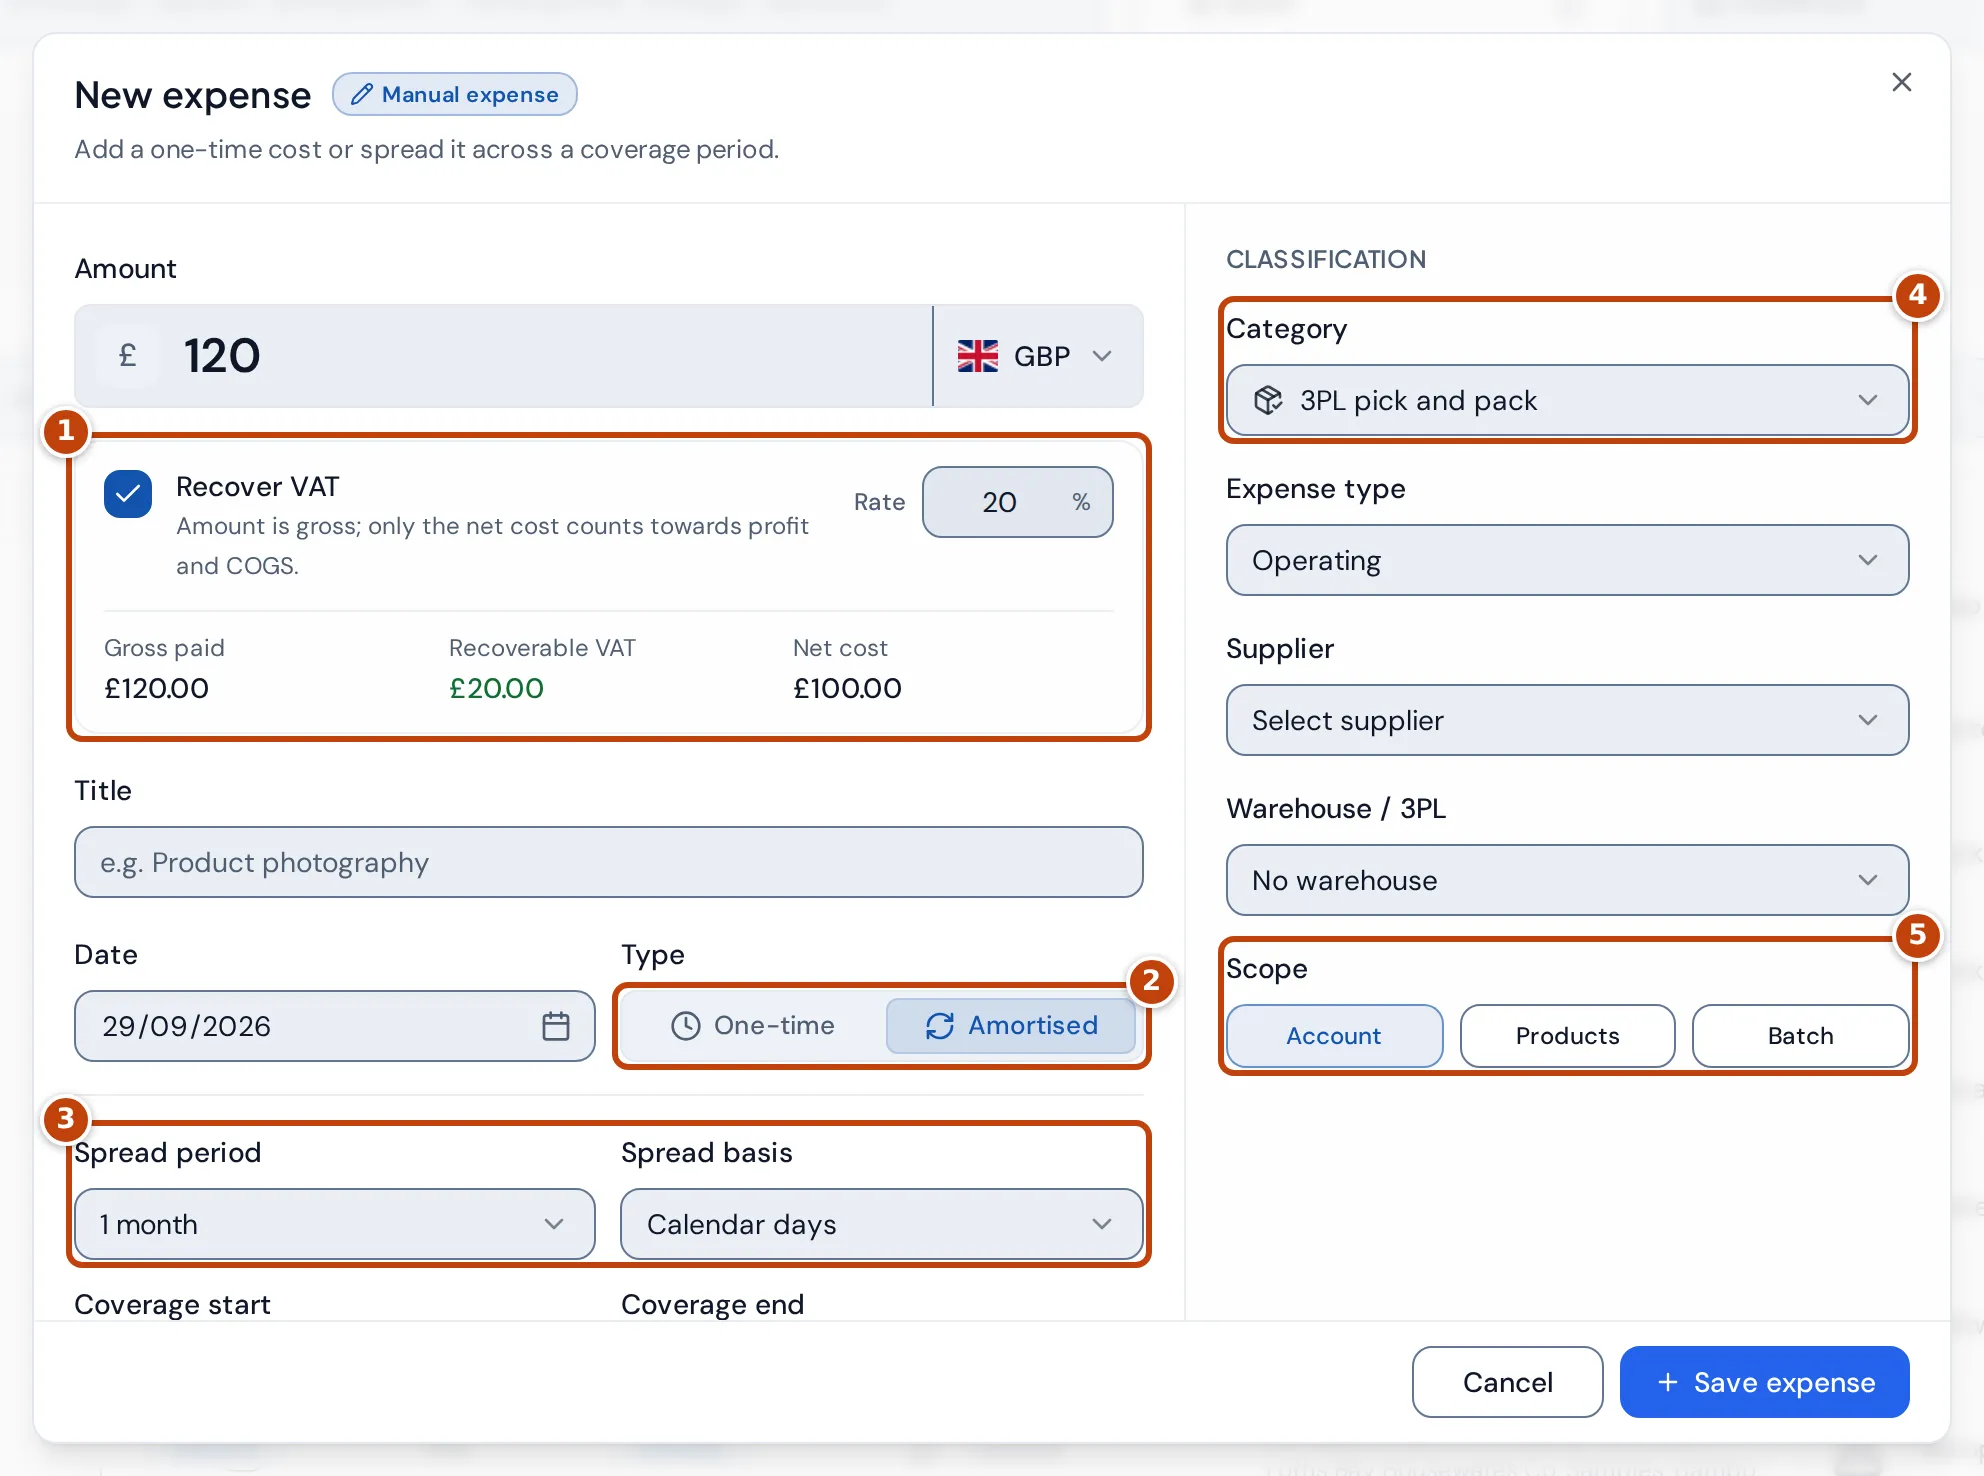
- On the Indirect expenses tab, select Add expense.
- Enter the Amount and choose its currency.
- Optional: tick marker 1 Recover VAT if you can reclaim the VAT, and check the Rate. Enter the amount you paid including VAT. Only the Net cost counts towards profit and cost of goods.
- Enter a Title and the Date.
- Under marker 2 Type, choose One-time, or Amortised to spread the cost over time. For an amortised cost, choose marker 3 the Spread period (from 1 week to 12 months, or Custom dates) and the Spread basis (Calendar days, Weekdays only, Weekly or Monthly), and check the Coverage start and Coverage end.
- Choose a marker 4 Category. Optional: change the Expense type and choose a Supplier or a Warehouse / 3PL.
- Under marker 5 Scope, leave Account for a cost of the whole business, or choose Products and pick the products it belongs to, or Batch and pick a production batch.
- Select Save expense.
A batch scope spreads the cost evenly across the units of that production batch, as extra cost of goods instead of an indirect expense. When you recover VAT, only the net cost is spread. A product scope ties the cost to those products, so it stays in their figures when you filter the Dashboard by product.
The categories you start with are 3PL storage, 3PL pick and pack, Prep centre fees, Freight forwarding, External PPC agency, Software, Bookkeeping, Photography and creative, Samples, Packaging, Bank fees, Professional services and Other operating expense.
Review and approve expenses
Section titled “Review and approve expenses”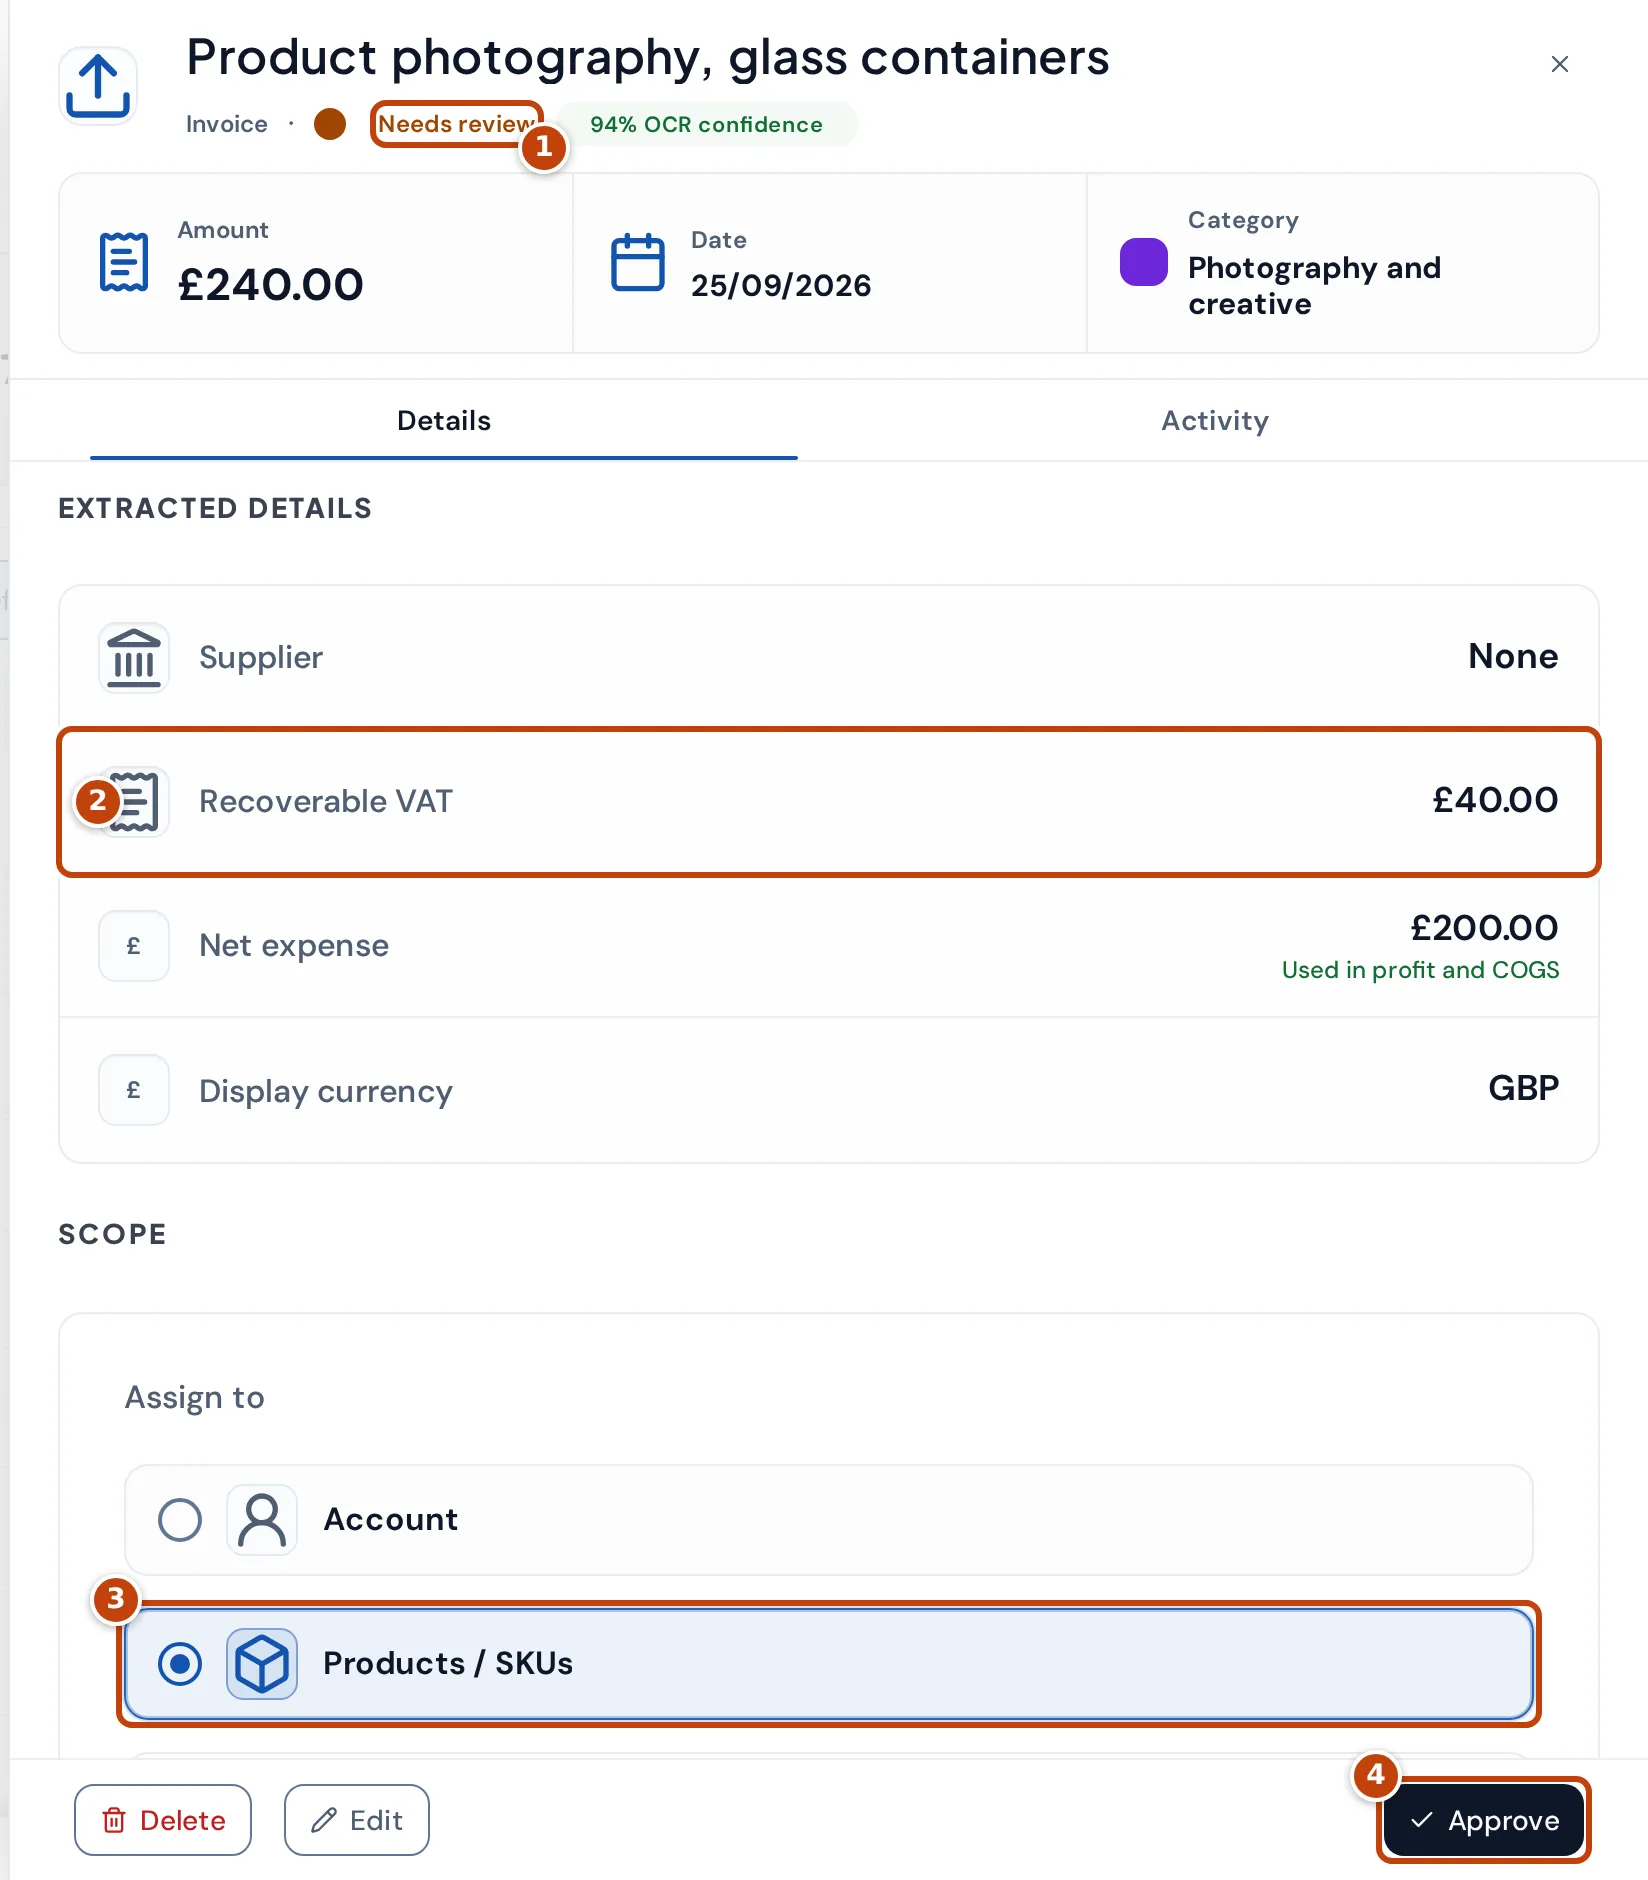
An expense with status marker 1 Needs review has a category that nobody has approved yet. Expenses you add by hand, from an invoice or from a bank import on this page are approved when you save them, so they don’t need this step. To check an expense that’s waiting for approval:
- Select its row. The panel shows the amount, date and category, and on the Details tab the supplier, marker 2 Recoverable VAT and the Net expense that’s used in profit and cost of goods.
- Optional: under Assign to, choose Account, marker 3 Products / SKUs or Production batch to change what the expense belongs to.
- Optional: select Edit to change the category or other details.
- Select marker 4 Approve. The status changes to Reviewed.
You can also approve, edit or delete an expense from the Open expense actions menu at the end of its row. To delete several, tick them and select Delete selected. Deleting removes the expense and recalculates the dashboard figures, and can’t be undone from the page.
To change whether you reclaim VAT on an expense, tick or untick the box in its Recover VAT column. Income you’ve recorded shows N/A there.
Add expenses from an invoice
Section titled “Add expenses from an invoice”- On the Indirect expenses tab, select Upload invoice and choose the invoice (PDF, PNG or JPEG).
- Crateworth reads the invoice and opens Invoice review with the supplier, invoice number, date, total and one entry per line, each with a confidence percentage.
- Check the Invoice currency. For each line, check the title, category, supplier and amount, and untick any line you don’t want.
- Select the create button, for example Create 3 expenses. The lines become expenses with status Reviewed.
Import expenses from a bank statement
Section titled “Import expenses from a bank statement”Download a CSV statement from your bank first. Crateworth works out which columns hold the date, description and amounts, so most banks’ exports work as they are.
- On the Indirect expenses tab, enter a Bank account label, for example “Business current account”. Use the same label every time you import from this account: Crateworth uses it to recognise transactions you’ve already imported.
- Select Import bank CSV and choose the file. Bank CSV review opens while the file is read.
- Check each transaction, as described in Check a bank import before processing it.
- Select the process button, for example Process 7 transactions. Crateworth creates the expenses, links any payments you confirmed to their purchase orders, and returns to the Expenses page with a note of how many it created and linked.
The import assumes the account is in your reference currency. To import an account in another currency, change the currency next to the label on Bank CSV review and select Import another CSV.
Crateworth suggests categories for the payments out of your account with AI, which uses your account’s AI credits. If you have none left, the import still works, but without those suggestions.
Check a bank import before processing it
Section titled “Check a bank import before processing it”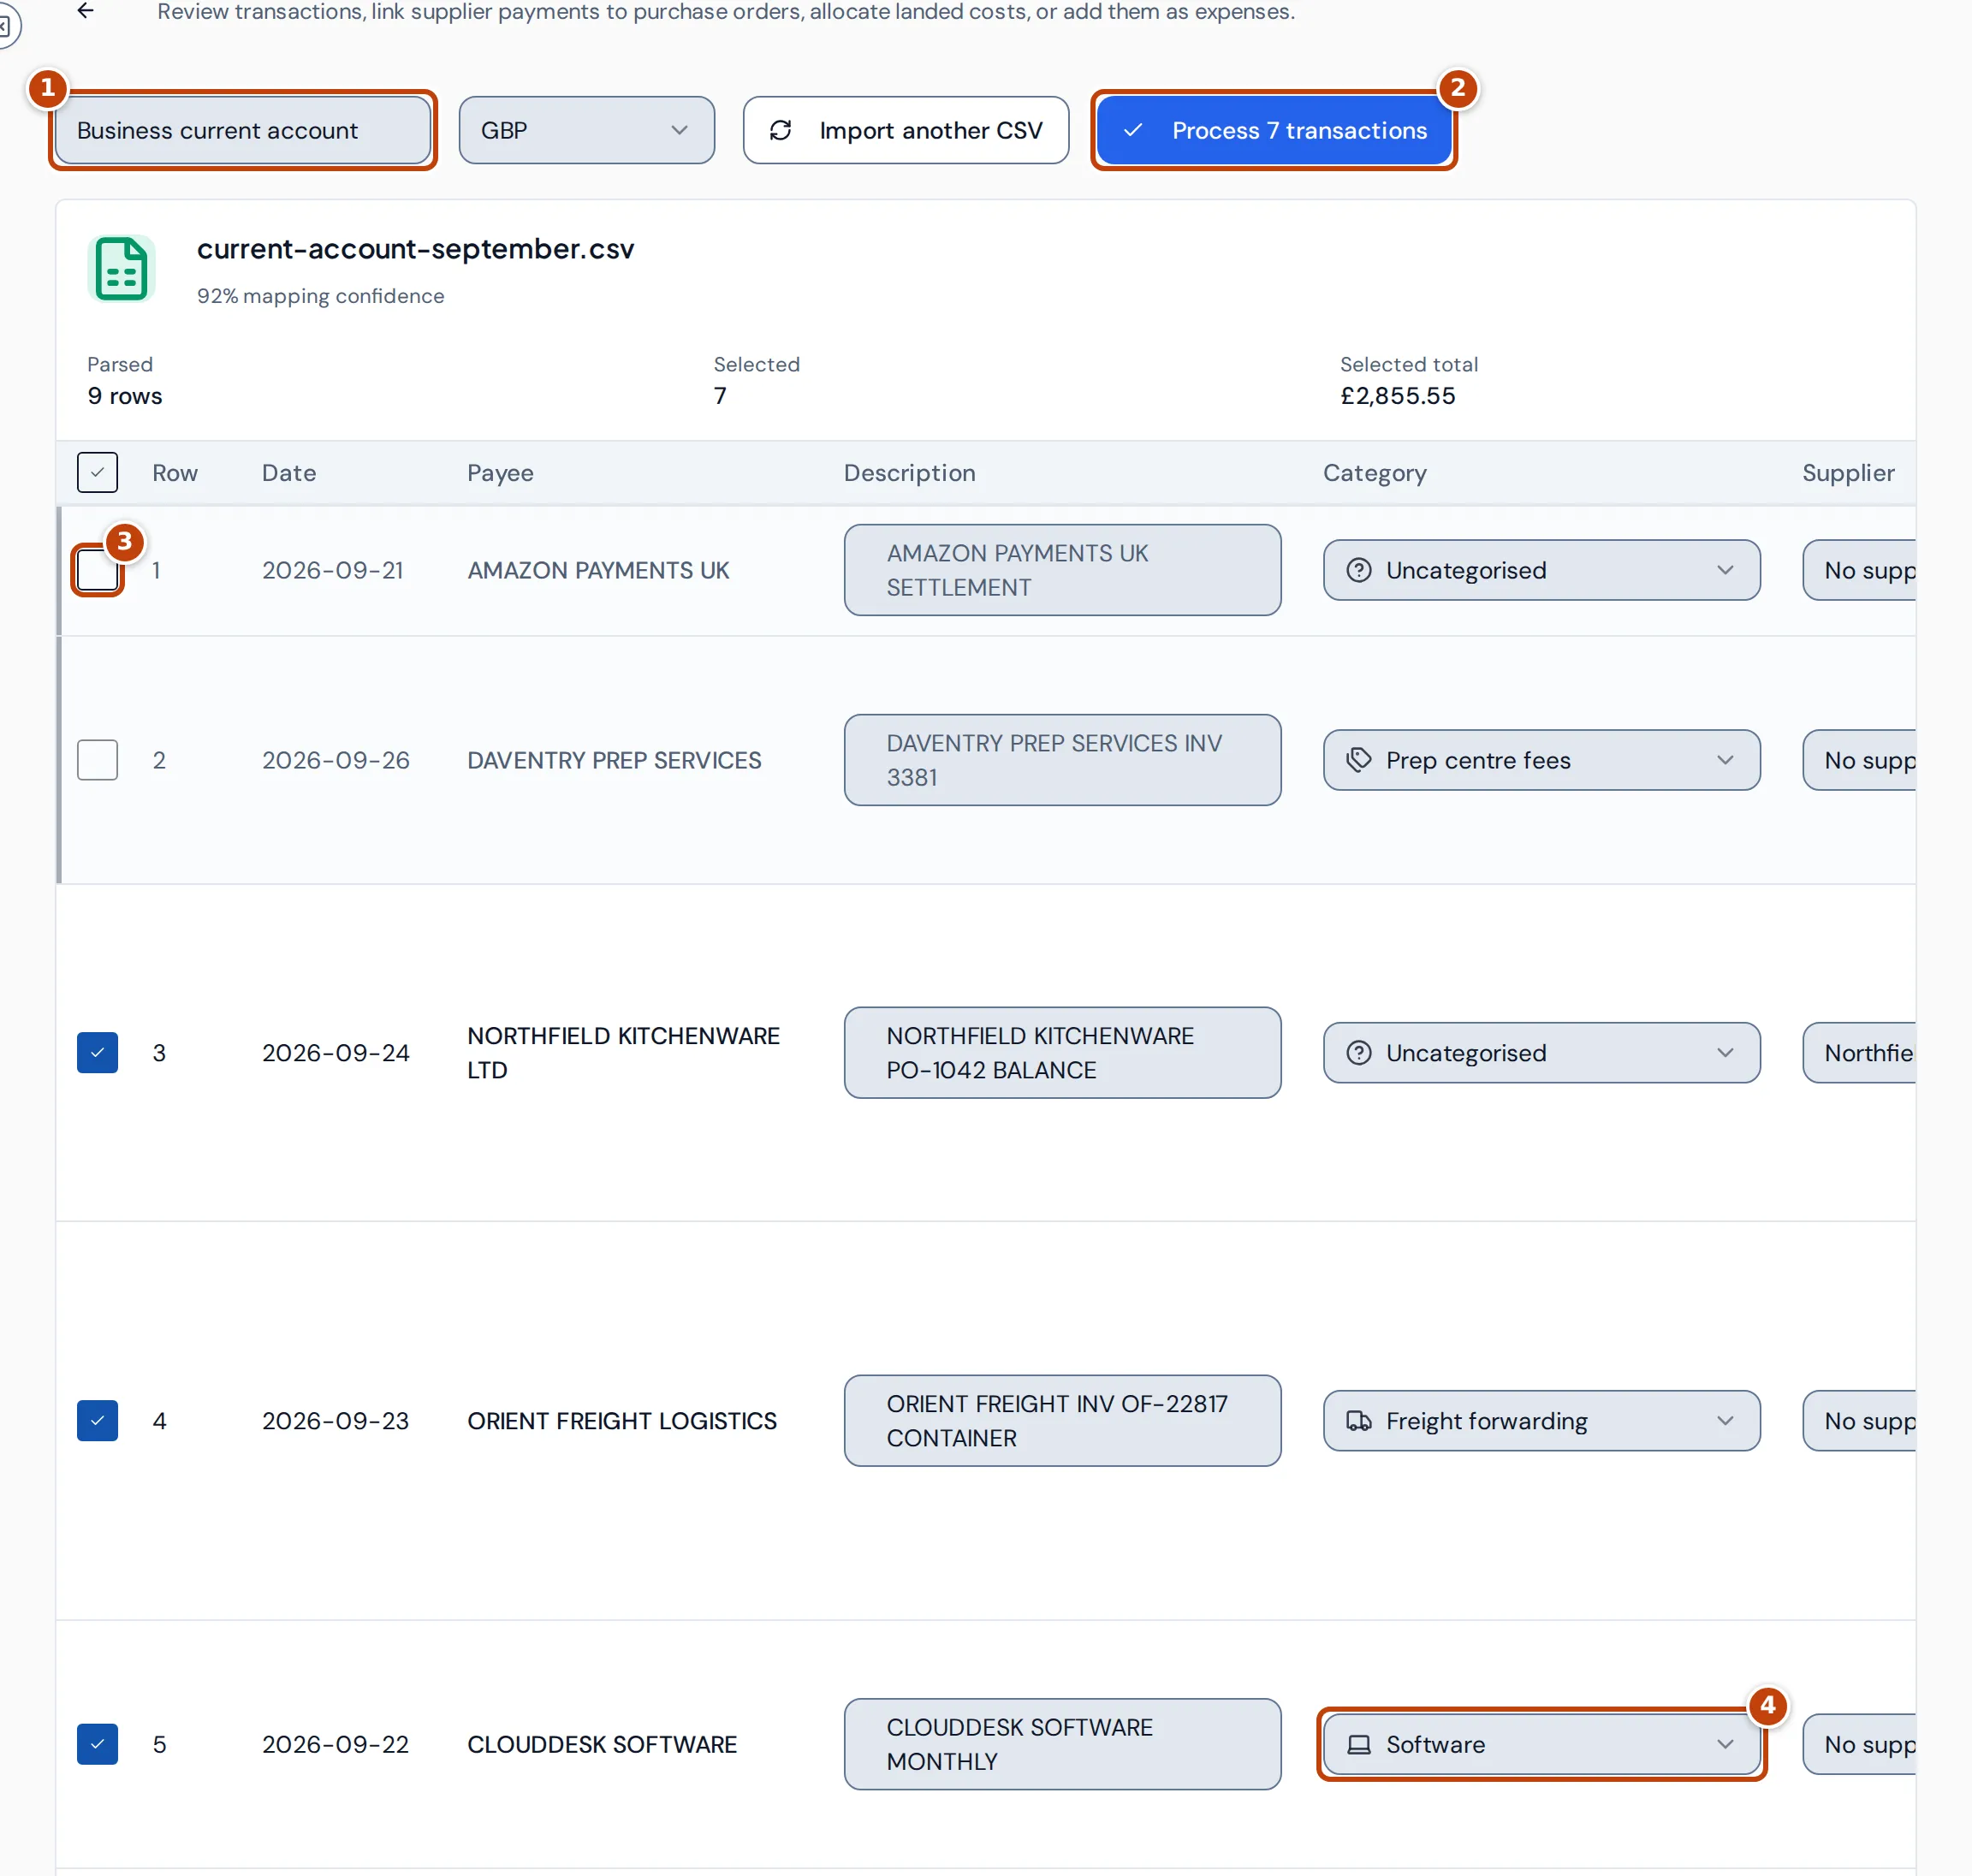
Bank CSV review lists every transaction in the file with its date, payee, description and amount. Only the ticked rows are processed, and Crateworth ticks them for you:
- Payments out of the account are ticked, with a suggested category marker 4 and supplier. Change either if it’s wrong.
- Money paid in, such as marker 3 your Amazon payouts, is unticked, with Skip as its recommended action.
- A transaction you’ve already imported from the same account label is greyed out and marked Duplicate, and can’t be ticked unless it matches a purchase order.
Untick anything that isn’t a business expense, such as a transfer to your own savings account, before you process the file.
For each row you’re adding, tick Recoverable VAT if you can reclaim the VAT, then enter the rate and choose the evidence you hold: UK VAT invoice, Import VAT (C79), Postponed VAT statement, VAT receipt or Other VAT evidence. For Import VAT (C79) and Postponed VAT statement, enter the exact VAT amount from the document instead of a rate. The row then shows the net cost, which is what counts towards profit, and notes that the evidence is still unverified. Without the tick, the whole amount counts as the cost.
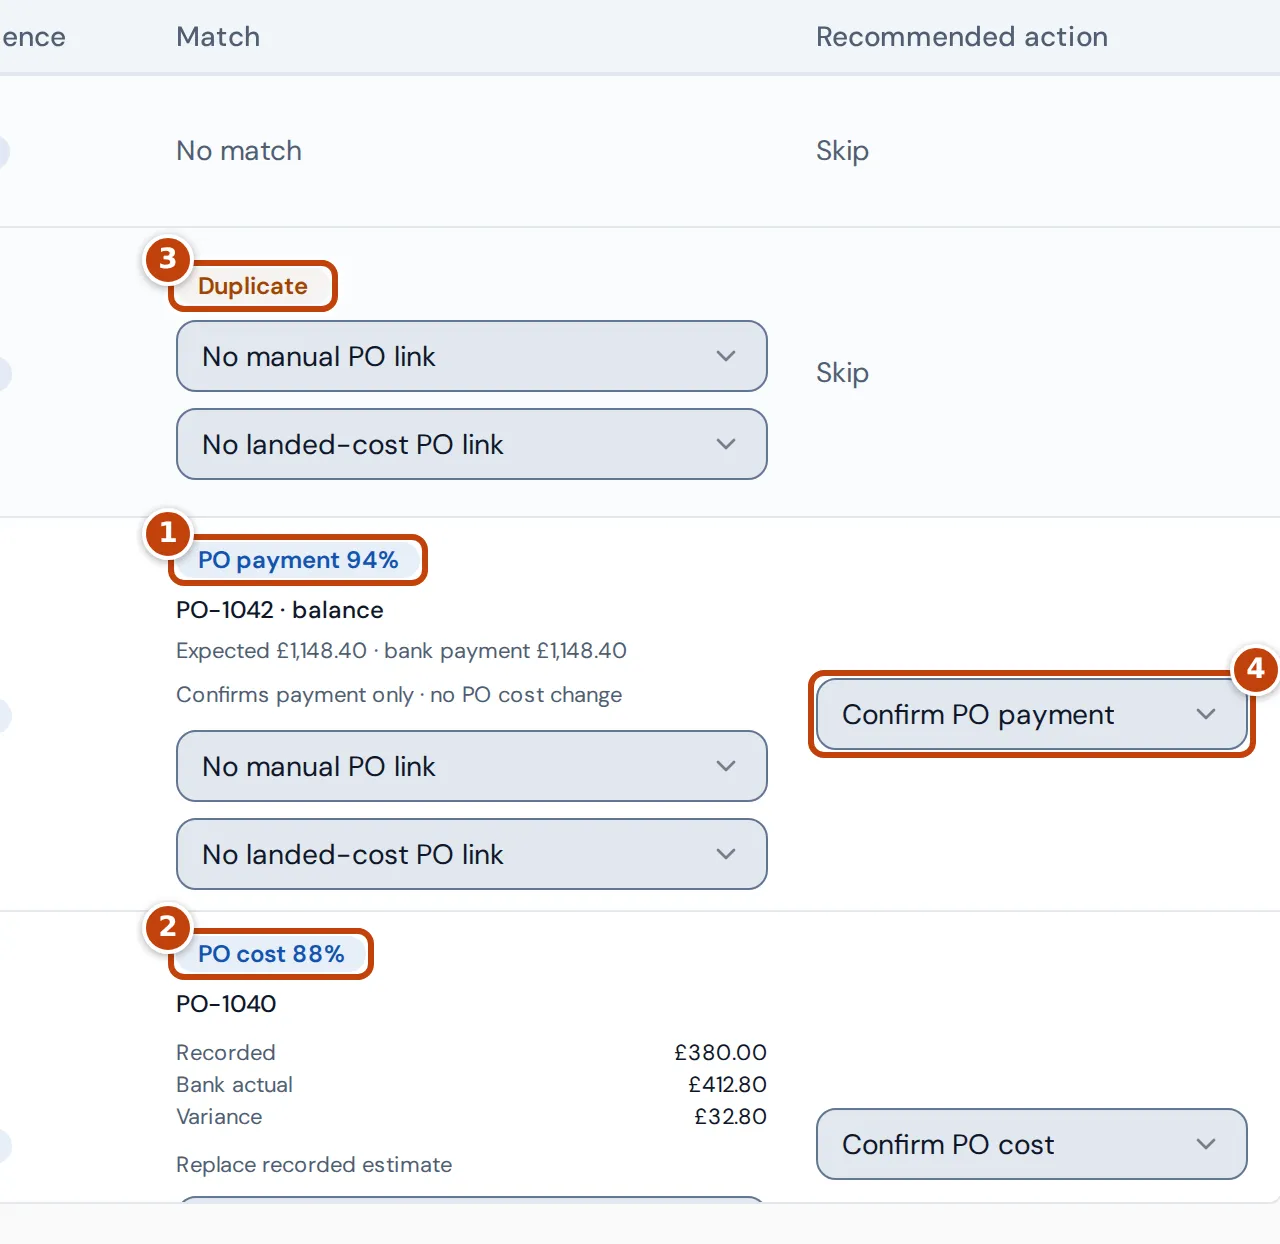
Scroll right to see the Match and Recommended action columns. Crateworth compares each payment out with your purchase orders:
- marker 1 PO payment means the payment looks like a deposit or balance on a purchase order. The recommended action is marker 4 Confirm PO payment, which records the payment against the order. It doesn’t change the order’s product cost, and the payment is listed as Capitalised rather than as an expense. Choose Keep as expense if it isn’t a payment for that order.
- marker 2 PO cost means the payment looks like freight, shipping or customs for a purchase order’s shipment. It shows the cost recorded on the order, the actual bank amount and the variance, and what confirming will do: match the recorded cost, replace a recorded estimate, add a missing transport cost or post the variance as an adjustment. Confirm PO cost does that and lists the payment as Capitalised; Keep as account expense books it as an ordinary expense instead.
- PO required means the payment looks like a landed cost but Crateworth can’t tell which order it belongs to, so it’s kept as an expense unless you link it.
- marker 3 Duplicate marks a transaction that’s already been imported.
- No match means the payment isn’t linked to an order.
To link a payment yourself, use Link to PO payment… or Link freight/customs to PO… in the same column. For a payment linked to a purchase order, the VAT and net cost come from the documents attached to that order.
Link a bank expense to a purchase order later
Section titled “Link a bank expense to a purchase order later”If you processed a supplier payment or a freight bill as an expense, you can still move it onto its purchase order. Open the row’s Open expense actions menu and select Link to PO, then choose the Purchase order and the Payment type: a Supplier PO payment (with its Payment stage, deposit or balance) or a Freight / customs landed cost (with its Landed-cost type). Select Link and capitalise. The expense becomes Capitalised: it’s part of the order’s cost and no longer counted as a separate operating expense. Link to PO is only offered for payments out of your account that came from a bank import.
Automate costs with expense rules
Section titled “Automate costs with expense rules”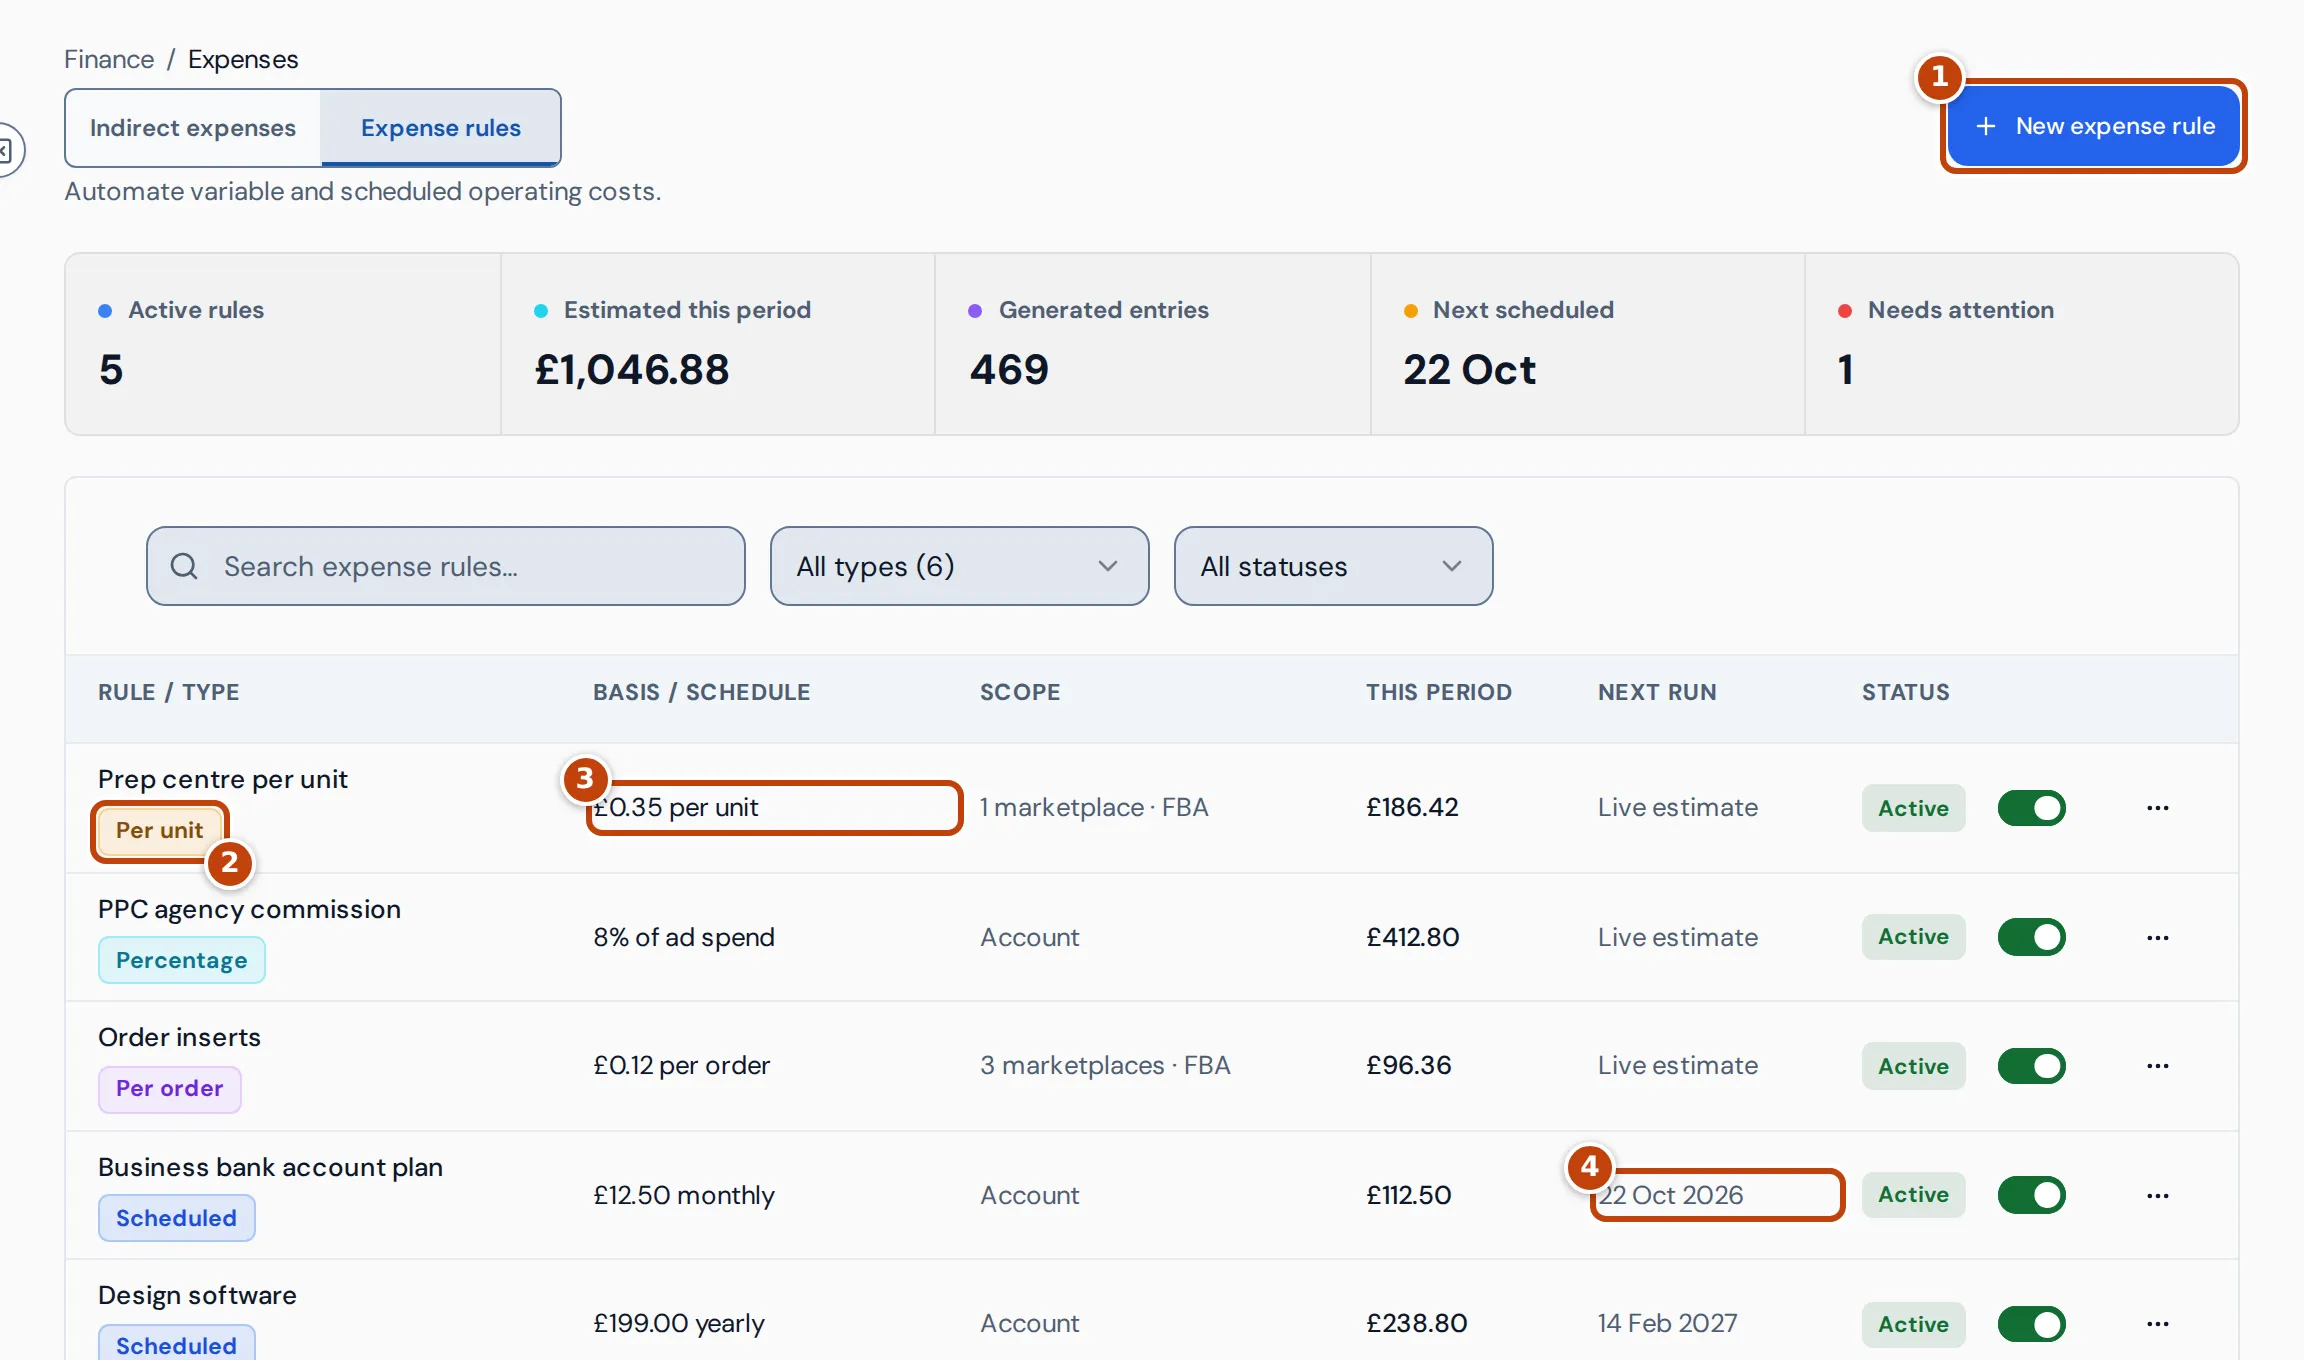
An expense rule books a cost for you, either on a schedule or as a share of your sales, orders, units or ad spend. Use one for costs that follow your trading, such as a prep centre’s charge per unit, an agency’s percentage of ad spend, or a monthly subscription. To see your rules, on the Expenses page select the Expense rules tab. To add one, select marker 1 New expense rule.
Each rule in the list shows, under its name, its type marker 2 (Scheduled, Percentage, Per order or Per unit), then marker 3 its basis or schedule, its scope, This period and its marker 4 next run. Next run is the date of the next scheduled entry, Live estimate for rules worked out from your sales (or a scheduled rule past its end date), Not generated for a rule that hasn’t booked anything yet, or Paused. The switch in Status pauses or activates a rule. Pausing a rule removes the entries it has booked, so they no longer count in your profit; activating it books them again.
The summary cards count your Active rules, show Estimated this period, count the Generated entries your rules have booked, give the date of the Next scheduled entry, and under Needs attention count the rules that are paused.
This period is the total of the entries a rule has booked, and Estimated this period adds up those totals for all your rules. Both are in your reference currency and include any VAT, because that’s the amount each rule entry counts in your profit. The Expense rules tab has no date filter, so both figures cover every entry your rules have booked so far. A paused rule shows £0.00, because pausing removes its entries.
Select a rule to see its formula with the Total it has booked, its scope, its VAT forecast, its Current estimate (the same total, marked All dates) and when it last generated entries. From there:
- Preview entries lists the entries the rule has booked, newest first, with each entry’s date, description, scope and amount. A rule with more than 500 entries shows its latest 500.
- Edit rule changes the rule.
- The Rebuild generated entries button books its entries again.
- The bin deletes the rule.
Create an expense rule
Section titled “Create an expense rule”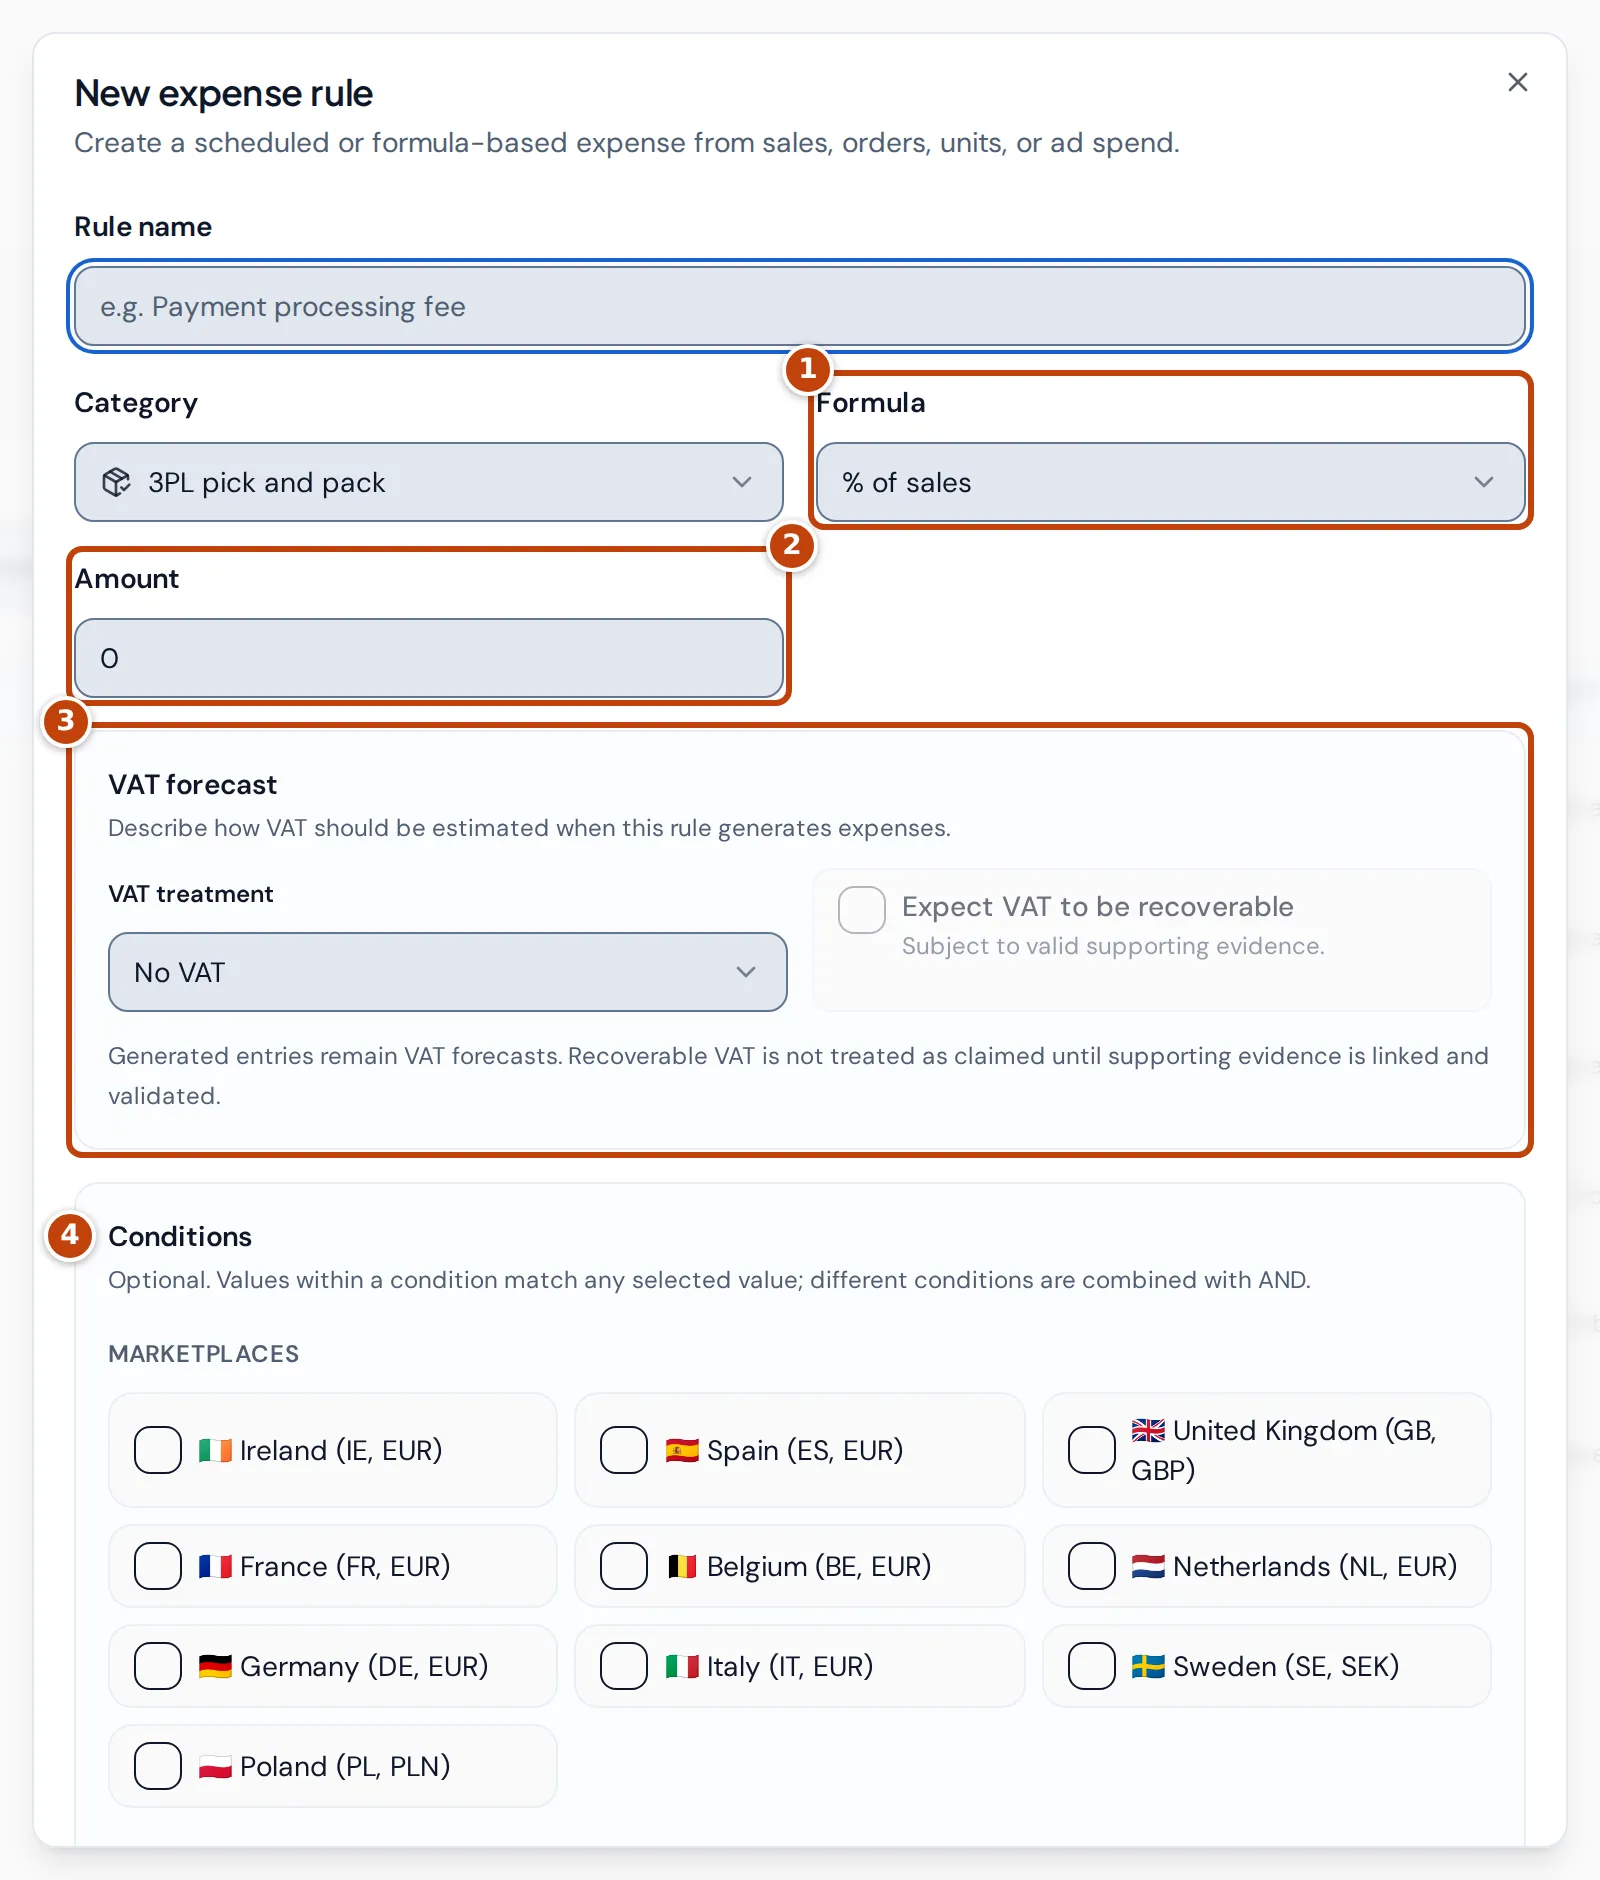
- On the Expense rules tab, select New expense rule.
- Enter a Rule name and choose a Category.
- Choose the marker 1 Formula: Scheduled, % of sales, Fixed per order, Fixed per unit, % of ad spend, or a percentage of one ad type’s spend (Sponsored Products, Sponsored Brands, Sponsored Brands Video or Sponsored Display). For a scheduled cost, choose the Frequency: Daily, Weekly, Monthly, Quarterly or Yearly.
- Enter the marker 2 Amount: a percentage, or a fixed amount and its currency.
- Under marker 3 VAT forecast, choose the VAT treatment and, where it applies, the VAT rate and whether the amount includes VAT (Amount basis). Tick Expect VAT to be recoverable if you expect to reclaim it. Entries a rule generates stay VAT forecasts: their VAT isn’t treated as claimed until supporting evidence is linked and validated, so each entry counts in your profit at its full amount, including any VAT.
- Optional: under marker 4 Conditions, limit the rule to some Marketplaces, products, product tags, a Fulfilment channel or an Order status. Values within one condition match any of them; different conditions must all match. Fulfilment channel and order status aren’t offered for scheduled or ad-spend rules.
- Set the Start date, and optionally an End date and a Description.
- Optional: tick Advertising cost if the rule’s entries are advertising.
- Leave Active ticked, and select Create rule.
When you save an active rule, Crateworth books its entries from the start date up to today (at most two years back), then keeps them up to date in the background. Rule entries count in your profit like any other expense, but they aren’t listed on the Indirect expenses tab. To see them, on the Expense rules tab select the rule, then select Preview entries.
Where expenses appear in your figures
Section titled “Where expenses appear in your figures”Expenses are taken off profit as indirect expenses. On the P&L, Indirect expenses lists them by category for each month, and the Dashboard’s profit is after them. When you recover VAT on an expense, only its net cost is used. An expense scoped to a production batch is the exception: it’s added to the cost of goods of that batch’s units instead. A capitalised bank payment isn’t an expense either: a supplier payment is already covered by the purchase order’s stock cost, and a freight or customs payment becomes part of the order’s landed cost. Both reach profit as cost of goods when the stock sells.
Expenses don’t affect the Payouts page, which shows only what Amazon pays you.
Why you can’t add or import expenses
Section titled “Why you can’t add or import expenses”Add expense and New expense rule need permission to edit profit, and Import bank CSV needs permission to edit accounting. Upload invoice needs both. If a button is missing, ask the owner of the business to change your access. See Team.
Why an expense shows Unmatched or Needs review
Section titled “Why an expense shows Unmatched or Needs review”- Unmatched means the expense has no category, often a bank payment Crateworth couldn’t recognise. Edit it and choose a category, then approve it.
- Needs review means the expense has a category but nobody has approved it yet. Check the details and select Approve.
Both still count in your profit while they wait. Approving them confirms the category is right. Expenses you add by hand, from an invoice or from a bank import are approved when you save them, but a bank payment saved without a category still shows Unmatched.